Friday, November 4, 2016

Impulse Buy: Versonel 6 Quart Programmable 6 in 1 Electric Pressure Cooker

Woot.com is a dangerous place, besides the all-cunsuming desire to score yet another Bag of Crap they often have great deals on things I want but probably really don't need.  Such was the case last week when I succumbed to impulse and bought a Versonel 6 Quart Programmable 6 in 1 Electric Pressure Cooker from the site.  I had heard a lot about Instant Pot electric pressure cookers and how useful they can be and this looked very similar at a much lower cost.  Turns out there's a good reason for this, looking up the UL Certification number on their database revealed that both the Versonel electric pressure cooker and the Instant Pots are manufactured by Guangdong Media Consumer Electric Manufacturing Co LTD.

Anyway, the pressure cooker arrived on Wednesday!

Front view of the Versonel Pressure Cooker box.


Side view of the box
I haven't really had a chance to play with my new toy yet, but I wanted to at least make sure it worked  so I thought a few red potatoes I had laying around would make good test subjects.  After cleaning the bowl with soap and hot water to remove any manufacturing residue I put in the potatoes and some water.  The lid was placed on the cooker by lining up an arrow found on the lid with the corresponding one on the body, then turned clockwise until an audible signal (a series of tones going up in pitch) indicated that the lid was in position.  I chose the "Soup/Stew" preset for no good reason.  After pushing the button the indicator flashed for about 10 seconds before the display changed to "On".  It took about 15 minutes for the water to start to boil and the red button on the lid to pop up indicating the pot was pressurized, once the programmed pressure was reached the display changed to a countdown timer.  When the time had elapsed a signal sounded and it was time to release the pressure.  To do so you just turn lever on the lid left or right, the steam shoots straight up so it's a good idea to place a dish towel on the lid if you have the pot sitting on a counter under cabinets.  You also may want to move the lever with a fork or something to keep your fingers away from the escaping steam.

The potatoes turned out pretty good, the skin peeled off without much difficulty and I was able to mash the flesh easily with a fork.  I've downloaded a bunch of free pressure cooker cookbooks from the Amazon Kindle store including this one, so after work today I'll come up with something to do over the weekend.  

Looking at various Instant Pot models, the Versonel looks most like an IP-LUX60.  I'm not sure if it the same hardware with slightly different cosmetics or if they made something that just looks like the more expensive Instant Pot out of sub-par hardware.  Time will tell.  One thing missing from the Versonel is the steaming rack that comes with the Instant pot, but the rack from my Avalon Bay Air Fryer fits pretty well.  There is no recipe book included (although like I mentioned there are lots of free or very cheap ones available from the Kindle store on Amazon.com) and the manual doesn't really give you that much information.  Luckily the controls look pretty intuitive so it should be pretty easy to learn how to use.

Counter space is getting a little sparse due to all the gadgets I have living in the kitchen, luckily this addition also works as a slow cooker so I'll be able to relegate the old crock pot to the garage or a closet somewhere.

Monday, October 17, 2016

It's Here!: Misen Chef's Knife Edition

My latest Kickstarter acquisition is the Misen Chef's Knife.  The stated goal of this Kickstarter campaign was to produce "An amazing knife at an honest price", they plan on selling the knife directly to consumers via the Misen web site for $65.  So how good is it?

 First off, the packaging is impressive.  Each knife comes in a box custom designed to keep it safe and secure for shipping or transporting.  In the photo to the left I've already removed the inner box from the outer sleeve.  Upon opening the box the first thing you see is a card showing care instructions, on the other side are pictograms of different types of cuts demonstrated on carrots.


Below the card is a plastic insert that snugly holds the knife in place.


 The Misen knife weighs in at 218.9 grams, about 33% lighter than my go-to Mac Professional 9 1/2" French Chef's Knife.


The balance point is just where it should be, right at the bolster where the handle meets the blade.  If a chef's knife isn't balanced properly you end up expending extra energy moving the blade which causes muscle fatigue.  The handle is made of molded thermoplastic and is very comfortable to hold.


 My knives arrived on a Saturday in the afternoon, I wasn't expecting them until Monday so I didn't really have anything planned.  I did have a new formulation of pizza dough in the refrigerator I saw on Chef Steps that I was going to use on Monday or Tuesday so I decided to pull it out early and make some pizza!  The Misen had no trouble cutting extremely thin slices of onion and I was able to quickly chiffonade basil (picked from the AeroGarden) for the top.  So far I'm very pleased with my new knife!


MMMM, pizza!

Friday, October 14, 2016

Brisket flat smoked in the Bradley Original Smoker

Since I bought my Bradley Original Smoker last year I've wanted to take a stab at brisket, but there was no way I could possibly justify buying a whole brisket when it is just two of us doing the eating.  The solution came when a nearby grocery store put brisket flats on sale.  The smallest one I could find was a 3.5 pound untrimmed flat, which was more than enough for me to play with.

It was a dark and stormy day when I originally planned on smoking the brisket, and since rain and electric smokers aren't the best of buddies I had to throw the meat in the freezer and wait for my chance.  That day came the next weekend, when it was dry out but much cooler.

I started out early in the morning, around 5:30 am.  First thing was to set up the smoker and get it warming up.  I had recently bought a resin horizontal shed for my Weber grill and smoker to live in, it works great and keeps everything dry but the tradeoff was that in arranging things so everything looked nice and tidy I made the outlet I usually use for the smoker inaccessible.  No big deal, there's another outlet a few meters away.  Unfortunately that outlet was dead so I had to run an extension cord to the other end of the patio.  Now that the smoker had power I put a foil tray of water in the bottom to catch the fat rendering off the brisket and went to the kitchen to prep the meat.

I made a rub consisting of roughly equal parts kosher salt and ground black pepper, about a tablespoon and a half.  To this was added 1/2 teaspoon granulated garlic, cayenne pepper and celery salt.  I didn't really need to trim any of the fat cap off, so I just cut a cross hatch to help the fat render away during cooking.  The rub was sprinkled evenly over all surfaced of the brisket.  I temperature probe was inserted in to the meat from the side until it was roughly in the center.


At 6:15 am we were ready to go.  Once everything was in place the temperature probe wire was threaded up through the smoke vents and attached to the thermometer.  The second wire seen that can be seen in the photo is the thermocouple attached to my PID controller.  I had the controller set to 250°f, but the tray of water I put in to catch falling grease really made it difficult for the smoker to reach temp.  The highest temperature the chamber could reach while the water tray was in place was about 220°f.  The alarm on the meat thermometer was set to 165°f and I went about my day, every few hours I would go out to check on things, add more bisquettes (I was using the Jim Beam smoking bisquettes for the most part) and make sure everything was working properly.  With the tray of water keeping the temperature down it took almost 10 hours for the brisket to reach the target temp of 165°f.  Now it was time to wrap.


I wrapped the brisket flat in parchment paper (for some reason you can't find plain butcher paper anymore, then wrapped everything up in aluminum foil.  Since there was no longer a danger of melting fat dripping down and starting a fire I removed the tray of water at this time as well and emptied the bowl of used bisquettes.  With the extra water out of the picture the smoker quickly reached the controller set point of 250°f and things moved quickly from there.  In less than 2 hours the brisket flat had made it to the final temperature of 195°f, was removed from the smoker and put in a beer cooler to rest.  195°f as the final temperature was pulled from a recipe online, I had seen anywhere from a low of 195°f up to a high of 204°f and decided to go low thinking that carryover would take the temperature up at least a few degrees.  I was wrong, because this was such a small piece of beef compared to a while brisket there wasn't much if any carryover.  To bring it up a few more degrees I ended up putting the wrapped brisket in a 200°f oven while I went down to the patio and got everything broken down and stowed away in the shed.

 Here's the final product, nice bark on the top but a little too salty.  Next time I'll have to go lighter on the rub.  The meat was moist and delicious, not quite as fall-apart tender as I would have liked but very good.  Next time I'll take it to a higher temperature, possibly 200° or  even a few degrees higher.

This turned out good, but I think I can make it great next time with a few minor tweaks.  I prepared the leftovers for freezing by vacuum sealing them and putting them in a 150°f water bath for a few hours with my WiFi Nomiku maintaining the temperature.  The packs were then chilled overnight before being thrown in the freezer.  It'll be much easier reheating brisket from the freezer this winter than freezing my butt off trying smoke another one during a Chicago winter!

Wednesday, September 28, 2016

Impulse Buy: Veggetti Pro

Last weekend I ran into the local Bed Bath and Beyond to get a new broom for the patio, I'm not sure exactly what happened to the old one but I found it in pieces.  While walking towards the back of the store where they keep the brooms I passed a stack of Veggetti Pro spiralizers on sale for $19.99 and just had to buy one.


The concept of a spiralizer is that you rotate the food while pushing it through a fixed blade, the Veggetti Pro comes with a ribbon cut insert, a thin spiral insert and a thick spiral insert.  So far I've only used the thick spiral insert to make curly fries out of sweet potatoes and russet potatoes.  Both turned out to be surprisingly easy to cut.  The Veggetti Pro has a suction cup on the bottom to attach it to a countertop, I find that wiping the counter down with a wet paper towel makes for a much stronger seal.  You secure the food to be cut by first pushing one end onto the round metal blade located on the insert, then push up the spiked plate attached to the handle to secure it in place, then use the green handle on the side to push the food through the blades while rotating.  Both potato and sweet potato went through easily.  After cutting they were seasoned (salt/white pepper for the sweet potato and the KFC spice mix for the russets), tossed with olive oil and cooked in the Avalon Bay air fryer.  Both turned out very good.

I'm pretty happy with this cheap gadget and look forward to finding new things to spiralize.  Everything comes apart easily for cleaning, the instructions say that most parts are top-rack dishwasher safe but I find that hand cleaning isn't difficult at all.  One thing that would make it better would be to have a removable catch bowl, the cutter blade is pretty close to the counter so there isn't much room to put down anything deeper than a dinner plate.  There is also a fair amount of waste, you end up with about a 1/2" diameter core and another 1/2" cap that doesn't go through the blade inserts.


Tuesday, August 16, 2016

Sous Vide Smoked Pork Shoulder

I haven't used my New Bradley Original Smoker much this year at all, since I was going to be stuck in the neighborhood all weekend due to a festival at the nearby Buddhist temple I decided it would be a good opportunity to get my smoke on.  I decided to make some pulled pork, but rather than just do the whole thing in the smoker I wanted to try something different.

There have been posts about people using sous vide in combination with smoking to good effect with beef, so I decided to try it with pork shoulder.  On my way home from work I stopped by the grocery store and picked up a boneless pork shoulder roast, I usually go for bone in but this was on sale so I gave it a try.  Since this was a spur-of-the-moment thing I didn't have a rub ready so I just raided the spice cabinet and quickly put one together.

 The rub consisted of cajun seasoning, celery salt, paprika, black pepper and kosher salt.  Rub was liberally applied to all surfaces of the pork shoulder before it was placed in a vacuum bag and sealed with the Food Saver vacuum sealer.  I put about 8 quarts of water in a 12 quart Cambro container, attached my WiFi Nomiku immersion circulator and set the temp to 155°f.  The pork shoulder soaked at that temperature for around 24 hours before being removed from the bath, allowed to rest at room temperature for around 30 minutes and finally chilled and put in the refrigerator until I was ready to start smoking.


Using the PID controller I set the smoker temperature to 250°f and loaded it up with Jim Beam flavored bisquettes.  While waiting for the smoker to reach temp I removed the pork shoulder from the bag, removed all the gelatinized juices (purge) and patted the shoulder dry with paper towels.  The purge was reduced and mixed with a commercial mustard based barbecue sauce.  Once the pork was placed in the smoker a temperature probe was put in place and the shoulder smoked until the internal temperature again reached 155°f.  Once the internal temperature target was reached the pork shoulder was removed from the smoker, tented with foil and allowed to rest until the temp went down to 140°f, at which point it was shredded into pulled pork.


 The sous vide/smoked pulled pork turned out delicious, very moist but with a slightly different texture than a pork shoulder cooked entirely in the smoker.  I believe this is due to the lower temperature that the meat was subjected to, when smoking a pork shoulder in the traditional way you want the internal temperature to get up to around 202°f whereas the shoulder I cooked here never got above 160°f even with carry over.  One thing I will do differently next time is to trim most of the fat off the pork shoulder before cooking, the lower temperature didn't let the fat render off and become crispy.  To serve I dressed the pork with some of the mustard barbeque sauce, pickles and a little sriracha sauce.  It was delicious!

Improved Air Fryer French Fries

I've been playing with my Avalon Bay AB-Airfryer100 air fryer quite a bit lately, mostly for cooking frozen items like fries, onion rings and chicken nuggets but also for making french fries from scratch.  The homemade fries turn out good, but they lack the craggly crispy surface that comes from deep frying.  As an experiment I decided to try and damage the surface of the fries prior to cooking to see if I could get my "air fried" fries closer to the real thing.

I cut the potatoes into batons as usual, but before the soak I added a cup full of crushed ice to the bowl, covered with a tight fitting lid and shook the tar out of them for about 30 seconds.  I added enough cold water to cover the fries and let them soak for about 30 minutes, then rinsed thoroughly and patted dry with paper towels.  The fries were seasoned simply with 1/2 tsp olive oil, salt, pepper and paprika (one of the things I like about air frying is that you can season before cooking).  Another technique I played with this time is double cooking similar to what you do when deep frying french fries.  The first cooking was done at a lower temperature, 320°f for 10 minutes.  After shaking the basket I returned them to the air fryer and turned the temperature up to  400°f.  I removed the basket every 4-5 minutes to shake and check for doneness.  After a total of about 20 minutes they were golden brown and crispy.


The end result was a fry that seemed to be a bit crispier than the previous attempts, damaging the surface of the fries before cooking does seem to have created more surface area to get crispy.  The two phase cooking method may or may not have contributed anything to the final product, for my next attempt I'll try single stage cooking combined with the ice shake to see if the results are any different.


Monday, August 8, 2016

LG French Style 3-Door Refrigerator Model LFXC24726S

A little over a month ago our Kitchenaid side-by-side refrigerator gave up the ghost.  At some time during the night the compressor failed, and with the fans still running the temperature quickly rose.  I left work as soon as I was told that something was wrong, but by the time I made it home an hour later the temperature in the freezer section had increased to over 60°.  We ended up having to throw away everything.  The refrigerator lasted for a little over 14 years so I can't complain too much about the build quality, but I found the narrowness of the freezer section a little limiting.  After taking measurements of the cabinet opening we looked around at several options and finally decided on the LG LFXC24726S.  

The refrigerator is a counter depth French door style with a bottom drawer freezer compartment.  The capacity is a little smaller than the one we were replacing, but the space seems much more usable since the compartments aren't as narrow as in the side-by-side model.  A water and ice dispenser are located on the refrigerator door, with a compact ice maker located in the door of the refrigerator section.  The ice bin is accessible by flipping a latch and opening a small door within the refrigerator door, the bin holds about 4.5 quarts of ice when full.  So far we've been pretty happy with the refrigerator, although there is a rattle from time to time that I haven't had time to track down yet.  On another note, I would like to find the architect who thought putting a kitchen on the second floor with the only access being a 36" wide staircase and flog him with a wet noodle.  I'm sure getting major appliances up to the space wasn't that difficult before inconvenient things like walls were put up, but it was a MAJOR hassle to get this puppy up to the kitchen and installed.

I wasn't really planning on posting about the refrigerator, but an event over the weekend made me want to say something.  A fire broke out in a garage about a 1/2 block down the street, it spread to 2 houses and a garage across the alley before finally being doused by the fire department.  One firefighter was treated for minor injuries, but other than him the only damage was to property.  During the course of the fire a utility pole was destroyed and we were left without power.  We didn't know how long the power would be out, so we just decided to keep the refrigerator doors closed to try and keep everything cold until it was restored.  After about 4 hours I became a little concerned about the ice maker in the refrigerator door, I figured I should dump the bin so the melting ice wouldn't make a mess in the kitchen.  When I opened the ice maker door I was pleasantly surprised to find that all the ice was still frozen, it was all dumped in to a bowl which was then put in the refrigerator section to help keep things cool.  It took about 10 hours before the power was finally restored, almost none of the ice in the bowl had melted and the things in the freezer were still frozen solid.  I had been worried that we would have to end up throwing away another entire refrigerator full of food, but the new LG refrigerator is insulted well enough to keep that from happening.  Now I just need to track down that rattle...

Monday, August 1, 2016

Avalon Bay AB-AirFryer100R Air Fryer

An air fryer is a small, counter-top appliance that cooks by circulating hot air around the food at high speeds.  A heating element above the cooking chamber provides direct, radiant heat to the top of the food being cooked, while a powerful fan circulates hot air around the chamber and through the food.  I had heard about these in the past, but never really considered buying one for myself.  Because of my fondness for fried foods I received one as a gift last week for my birthday.

The model I received is an Avalon Bay AB-AirFryer100R.  The fryer comes with a perforated basket for cooking items that would normally be deep fried, like french fries, a solid, round baking pan and a rack.  So far I've only had a chance to use it a few times, once to make fresh cut french fries and again to cook frozen, pre seasoned curly fries from the supermarket. 

Raw fries with seasonings


Fries in basket after 10 minutes
For the fresh cut fries I took a large baking potato, cut it into batons about 3/8' thick and let them soak in cold water.  After about an hour I dumped the starchy water, rinsed the potatoes , covered them again with cold water and let them sit in the refrigerator until I was ready to use them later that evening.  To prepare the fries for cooking they were drained, patted dry in paper towels and placed in a bowl for seasoning.  For seasoning I used granulated garlic, celery salt, kosher salt, hot chicken spice mix (from my Nashville Hot Chicken post), and paprika.  About 1/2 tsp olive oil was added and everything was mixed together until the spices were evenly distributed.  The fries were put in the basket and the basket inserted in the frye.  The temperature dial was set to 400 and timer set to 10 minutes.  After 10 minted the basket was removed the I shook the fries to turn them over, then the basket was replaced and the timer set for another 10 minutes.  At that time they looked like they needed a little more time so I shook them up again and returned them for another few minutes, total cook time was around 24 minutes, this would be reduced if I had cut thinner fries.


Finished product
The end result was pretty good, the fries had a nice crispness on the outside while the inside was fluffy like a baked potato.  I wouldn't mistake these for good, deep fried french fries, but they were pretty close and much healthier.

For the second experiment I wanted to see how frozen french fries would fare in this air fryer.  I bought a bag of cheap, seasoned curly fries that were on sale at the grocery store.  These were by Mariano's house brand, Roundy's.  I took the fries directly from the freezer and put them in the basket, turned the temperature dial to 400°f and set the timer for 10 minutes.  As before, the basket was removed at that time and the contents shaken up.  The timer was set for another 10 minutes and I pulled the fries out and shook every 2-3 minutes until they were done.  Frozen to done took about 18 minutes.  These turned out really well, very crisp on the outside and moist on the inside with nothing added at all.  I've never been one to keep bags of frozen fries in the freezer, but I think I'll now have to keep some on hand for a quick snack.  Next I'll have to see how frozen onion rings work out...


Frozen curly fries
The air fryer comes apart easily to clean, not that there was much of a mess with what I was cooking this time.  The recipe book that comes with the AB-AirFryer100 has some pretty interesting dishes, from fajitas to brownies.  I'll have to explore it more when I have the time.  Even though I never seriously considered buying one of these I must say that I'm impressed so far with how it works.  I'm looking forward to being able to make faux fried foods without having to go through the hassle of setting up a deep fryer, stinking up the house and having to filter or dispose of quarts of oil.  Obviously there are things that an air fryer isn't suited for, like battered items of falafel, but I can still break out the Paragon cooktop if I really want to indulge in those things.  I assume it would work fine for breaded items, I may have to try some air fried chicken before too long to test that out, or maybe air fried pickles!

Thursday, July 21, 2016

Homemade Chicago Deep Dish Pizza

I've never had a good Chicago style deep dish pizza outside of Chicago.  When I'm visiting friends and relatives in other areas of the country they often want to take me to a local place that serves "authentic" Chicago deep dish, but it rarely delivers.  Most often they just serve a version a pan pizza, a thick crust topped with standard toppings baked in a walled pan.  Chicago deep dish is baked in a similar pan, but has a much thinner crust that's pressed into the pan and up the sides.  For some time I've been experimenting with my recipe for Chicago deep dish pizza, but because I don't want to weigh 300 pounds I have to take it a little slow.  Here is my latest attempt...

The pans used for deep dish pizza are usually made of blue steel and have to be seasoned, I used to have a nice blue steel one like this one from Ottinetti but at some point over the years it was lost.  Blue steel pans have to be seasoned, but once that's done they'll last for years and years as long as you take care of (and don't misplace) them.  Lacking an authentic deep dish pan I opted to just use a large cast-iron skillet.

I used the following recipe for the dough...

300 grams AP flour
174 grams water
70 grams corn oil
7 grams EV olive oil
9 grams IDY
4 grams sugar
6 grams salt

The sugar was dissolved in the water and the yeast sprinkled over top and mixed in.  After allowing that to sit for a few minutes all the rest of the ingredients were added and mixed for about 1 minute.  The dough was then put in the refrigerator overnight.  The next morning the dough was put out at room temperature and allowed to ferment all day while I was at work (about 9-10 hours), my theory on the buttery flavor in good Chicago deep dish dough is that the long, warm ferment allows for the formation of diacetyl which is a component of artificial butter flavor.  When I got home I pressed the dough in to the pan and up the sides.  The dough was a little too slack in my opinion, next try I'm going to cut the oil down by about 25% to try and get something a little easier to handle.


Slices of mozzarella were placed on top of the dough going up the sides, I also had some shredded mozzarella that I put on top of the slices.  Next came Italian sausage (from Bari here in Chicago), sliced onions, pepperoni and green peppers.  All that was topped with sauce and more cheese was sprinkled on top.  Normally the cheese on top would be a combination of pecorino romano  and parmesan but due to a recent refrigerator failure my food stocks are still a little low.

The sauce was simple, just a can of 6-in-1 crushed tomatoes seasoned with a a few teaspoons kosher salt, a clove of garlic (minced), 1 teaspoon of greek oregano and a little sugar to taste.

The pizza was baked at 400°f for 30 minutes, then the oven temp was lowered to 350°f and baked for another 30 minutes.  Once removed from the oven it was allowed to cool in the pan for ~ 5 minutes before being de-panned and put on a brown paper bag to wick away excess oil.

A pizza wheel isn't much use for this type of pie, a long chef's knife can be used but I prefer a rocker style pizza cutter.  The dough cooked well, but the excess slackness caused the edges to be a little thicker than I would have liked, reducing the oil in the recipe (to 50 grams corn and 5 grams EVOO) should remedy this problem the next time.  Flavor was spot on but I might go for a fennel or hot Italian sausage for the next go.  Still a work-in-progress but getting very close to where I want it to be.

Friday, May 27, 2016

Cheap, reusable alternative to bisquettes for a Bradley Smoker

I've really enjoyed my Bradley Smoker over the last year and hope to use it quite a bit this summer now that it's finally warmed up outside.  As described in an earlier post, the Bradly is an electric Smoker that uses compressed wood chip pucks, called bisquettes, to produce the smoke.  Bisquettes are fairly inexpensive (about 3 for $1 from Amazon) but I've had some trouble finding them locally, especially late in the season when places like Home Depot and Menard's have cleared out their grill supplies to make room for snow blowers.  This can be a problem if I forget to plan ahead and don't have a supply on hand when I want to smoke something.  The other thing is that you're restricted to the woods that Bradley decides to make available in bisquette form.

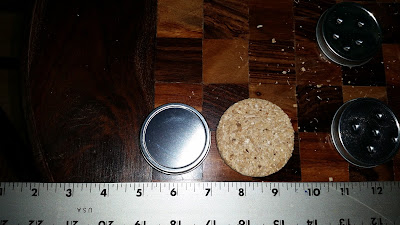
A recent thread on The Hungry Onion about electric smokers got me to thinking about finding an alternative to bisquettes for those times that I may be out or when I want to use something different for smoke than what's available (herbs, tea, other woods etc...).  I started looking around and found these 1 ounce flat metal tins on Amazon (often sold as containers for homemade lip balms) that are close in dimensions to a bisquette (about 3/8" less in diameter and 1/16" thicker) and decided to give them a try.

Here is one of the tins next to a bisquette.  Using the reamer tool on a Swiss army knife  I punched several holes in the lids (ended up with 9 per tin).  I had been saving the left-over wood chips in the bottom of bisquette trays and put about a teaspoon of chips in each tin, closed them up and loaded them in the bisquette hopper.  The test run went really well, the control box advanced the tins down the ramp to the burner plate with zero issues.  Due to the slightly lower diameter each tin ended up spending a total of 40 minutes on the burner plate, half on and half off.  I opted not to fill the catch bowl with water as I figured that could damage the tins or make then difficult to open later for reuse.  When I did open the tins later all of the chips had burned up.  Hopefully I'll be able to fully load the tins with wood chips this weekend and see how they do in an actual cook!


Please keep in mind that the use of these tins as a bisquette alternative is an experiment, try at your own risk!

Tuesday, May 10, 2016

NuWave PIC2 Portable Induction Cooktop

A few days after I recommended the Rosewill induction cooktop that I've been using in the office for over three years, it started making odd clicking noising and giving me a brief "E1" message.  After a few seconds it would start heating but continued to make the clicking noises as long as it was operating.  After removing the casing to see if I could see an obvious cause I just decided it was time for a replacement.  I didn't want to spend too much money since this was going to live in my office, so after a brief search I settled on a NuWave PIC2 Induction Cooktop.


I remember seeing their infomercials on late-night TV and had heard good things about the hardware, but not so good things about buying it directly from them.  Since I have Amazon Prime I just ordered it from there for just under $60.  The PIC2 is a little less powerful than the Rosewill it's replacing, 1300 watts vs. 1500 watts.  For a little more money (about $75) there is the NuWave PIC Pro, which delivers 1800 watts of power.

Upon opening the box I was pleasantly surprised to find that the PIC2 came with a 9" Duralon ceramic coated non-stick fry pan.  I didn't really have a need for another frying pan at the house so it made the trip with the cooktop to live in my office.  The cooktop has six preset levels (Low-100°f, Med Low-175°f, Med-275°f, Med-High-375°f, High-425°f and Max/Sear-575°f) but you can use the controls to set the temperature to anything you want in 1° increments up to 575°f.  The cooktop is also programmable so you can set it to cook at one temperature for a set amount of time, them automatically lower to another temperature for holding.

So far I've only done one test run, I measured out 1 liter of cold tap water (50°f) and timed how long it took to come to a rolling boil using the Max/Sear setting.  This is pretty subjecting since results will vary greatly depending on the quality of the pan being used, and since these stay in my office I'm using the cheapest pans I could find.  It took 5 minutes and 45 seconds for the water to go from tap temperature up to a rolling boil.  This is actually a little faster than it took the Rosewill cooktop to bring 1 liter of cold tap water up to a rolling boil, but that was in a different pan.  Tomorrow will be the first time I use the new cooktop to make lunch, hopefully it'll be as good and last at least as long as the Rosewill did.

Wednesday, March 2, 2016

72 Hour Short Ribs

Short ribs are one of the most transformative dishes you can make using low temperature cooking.  The technique allows you to transform the meat inn to something with the tenderness of tenderloin, but with the full beefy flavor of a tough cut of meat.  The results can vary depending on the time and temperature used, in the past I've gone for 72 hours at 55°C which resulted in pink, medium rare meat which still held its shape when cut.  This time I decided to go with the recipe found in Nomiku's Tender app, which used a slightly higher temperature (60°C) for the same amount of time.


The recipe calls for red wine to be bagged with the ribs, since I use a Food Saver I find the best way to do this is to freeze the wine first so it doesn't get sucked out of the bag while the vacuum is being pulled.  I added a little Worcestershire sauce to the wine and let it sit in the freezer for a few hours until solid.  The ribs were liberally seasoned with salt and pepper, I like the flavor a pre-sear brings to the game so I heated up a skillet with some beef tallow and browned one side of each shot rib.  Once they had cooled a bit I bagged the ribs with the wine cube, a roughly chopped stalk of celery, some carrot, a quartered small onion, two cloves of garlic and some fresh herbs.  The bag was vacuum sealed and placed in a bath with the Nomiku set to 60°C.  I had never used the timer function before so I set it for 72 hours, adjusted the water level and put the lid on the Cambro.  After 72 hours I kind of expected the Nomiku to reduce the bath temperature to 50°C for holding, but instead it just stayed at the 60°C and started counting up.  I set the timer manually, I believe it's possible to have the circulator lower to a holding temperature once the timer counts down to zero but you may have to set it using the Tender app for that functionality.  For a sauce I quartered some crimini mushrooms and browned them along with some onions.  I removed the ribs from the bag, poured the purge through a fine mesh strainer and poured it in to the mushrooms to deglaze the pan.  A sprig of rosemary was added along with a clove of garlic and the liquid was reduced until it became syrupy.  For sides I boiled some new potatoes and steamed some asparagus over them while they were cooking.

The ribs ended up with a consistency like they had been braised, but still nice and pink.  The fat was quite soft and melted away when bitten in to.  I would probably not use the same wine next time, we don;t drink a lot of wine so I used a bit of Merlot from a small single serve bottle I found in the cupboard.  It resulted in an off odor when the bag was opened, next time I'll probably omit the wine and just use some beef stock instead.  Reducing the purge with the mushrooms resulted in a really nice sauce so if I want some wine flavor I'll probably just add it there next time.  With those few tweaks I think this will be a go-to dish.

Wednesday, February 24, 2016

Sous Vide Nashville Hot Chicken


Nashville Hot Chicken is starting to become more and more available outside Tennessee, basically a highly spiced piece of fried chicken that after cooking is coated with a paste of cooking grease and hot spices.  While I've never had the chance to try it at the source we now have several places in Chicago that serve the dish.  Not too long ago I can across this article at Kentucky.com and decided I'd try to do my take on this regional specialty.

I made a spice blend based on the one in the article with a few minor changes based on what I had in the cabinet.  The blend I came up with is:

3 TB cayenne pepper
2 ts dry mustard
1 1/2 ts table salt
1 ts sugar
1 ts chipotle powder (didn't have any hot or smoked paprika)
1 ts black pepper
3/4 ts garlic powder
1/2 ts celery salt (mainly because I have a crap-ton of celery salt)

Because I had them I decided to use boneless/skinless chicken breasts.  I generously dusted all sides of the chicken with the spice mix before putting them in a gallon size Ziploc bag and letting them sit in the refrigerator for 24 hours.  The next day I filled a 12 quart cambro up to the 10 liter mark, attached the WiFi Nomiku and set the target temp to 150°f.  Once the bath was heated I put in the bag containing the seasoned chicken breasts and let them soak for 90 minutes.  When done the bag was removed from the bath and put in the refrigerator to chill.

Now it was time to play with the Paragon Induction Cooktop.  I figured I'd make some fries first to go with the chicken, I cut a russet potato in to batons and let them soak in cold water for about 10 minutes before rinsing several times.  About 6 cups of grease (corn oil with a little bacon grease) was put in a 3 quart sauce pan and the wireless probe put in place.  The potatoes were drained, patted dry with paper towels and put in the cold oil.  Finally the Paragon temperature was set to 370°f, rapid precision mode selected and the unit turned on.  Once the oil temp got over 212°f I switched to gentle precision mode and made sure to shake the pan every two minutes or so to keep things from sticking together.  This method worked pretty well, however as you can see in the picture there were a few fries in contact with the bottom of the pot initially which caused to brown a little before the others.  I may look in to using a small, round cooling rack next time to keep them from coming into contact with the bottom next time.

Now on to the chicken.  A two stage breading station was setup with plain flour on one side and a mixture of buttermilk, the spice mix and some of the purge from the cooking bag in the other.  One of the cold chicken breasts was first dredged in the flour, then coated with the buttermilk mix and then back into the flour.  Once everything was nice and coated it was allowed to rest on a piece of parchment paper while the oil got back up to temperature (which doesn't take too long for that small quantity of oil in rapid precision mode).  The chicken was carefully lowered in to the oil and cooked until the crust turned a nice golden-brown color.  Since the meat was pre-cooked there was no reason to worry about the internal temperature reaching 165°f, it just needs to be heated through.  I turned the chicken breast once, which can be a little tricky in such a small saucepan so care is needed to prevent being splashed with boiling hot oil.  Once done a tablespoon of the hot oil was added to about the same measure of the spice mix and used to coat the chicken breast.

The chicken had great flavor and the sous vide fried chicken method ensures that the meat remains tender and juicy.  I could have done with a little more heat, next time I'm at the store I'll need to pick up some hot paprika to try and dial it up a bit.  All in all a successful first attempt, but still room to tweak the recipe.  I'll have to stop by Gus's Fried Chicken for some authentic inspiration!

Monday, February 15, 2016

Playing with the Paragon Induction Cooktop

Over the weekend I had finally some time to play around with my Paragon Induction Cooktop.  Before I could do that however, I needed to invest in some induction-ready cookware.  My T-fal professional skillet  is induction ready as well as my cast iron and carbon steel skillets, but none of my pots or saucepans would work with the new cooktop.  I went out looking for some suitable pots to use with the Paragon.

When I first became aware of the Paragon Indigogo campaign I thought it would be ideal to control the temperature during the mashing phase of homebrewing.  For this I needed an induction ready stockpot large enough to contain the mash, and because it would be exposed to acidic conditions it needed to have a stainless steel interior rather than aluminum.  The Tramontina 22 quart stockpot pictures to the left fits the bill nicely and at a low price to boot.  I also wanted a smaller saucepan to use for deep frying, soups and of course, sauces.  I ended up buying a 3 quart non-stick saucepan from Nuwave.  The Duralon non-stick coating is ceramic based and can withstand temperatures up to 475°f so it should have no problem with the temperatures needed for deep frying.  I plan on making some hush puppies later tonight so I'll get to see how it fares.

As a test I filled up the stockpot with around 14.5 liters of cold tap water to see how long it would to bring it up to 150°f.  Pairing the wireless probe to the cooktop is simple, just plug in the Paragon and push the button on the side to the probe battery case.  A Bluetooth symbol will flash three times and the probe will sync with the cooktop.  Once that is done you can select the rapid or gentle precise mode and set the desired temperature with the +/- buttons.  My understanding is that rapid mode will allow the maximum power level to go up to 10, while in gentle mode it is restricted to 5.  The starting temperature of the water was 50°f and in an uncovered pot is took 1 hour 10 minutes to reach 150°f (quick tip, the adhesive on the sticker started to loosen at around 110°f allowing it to be peeled off).  I did notice that the temperature consistently read 2°f higher using my Thermapen than what the wireless probe was showing, I'm not sure if there's a way to program in an offset but if not I'll just know to set the temperature 2°f lower than I want.  While I had the cooktop on I took the opportunity to sync it up to the FirstBuild app, I haven't had a chance to play around with it yet so I'm not sure what additional features it opens up but will try and do so this afternoon.


Wednesday, February 10, 2016

It's Here!: Paragon Precision Induction Cooktop Edition.

My latest gadget just arrived, the Paragon Induction Cooktop!  I haven't had a chance to play with it too much, probably won't be able to do so until the weekend, but wanted to post a few pics of the unboxing.


Here's the box as delivered.  A little damage on the corners and the box wasn't taped at all to prevent the box from being opened en route.

Here is the box opened to show all the gadgetry goodness!  The cooktop itself is a bit larger than I expected, the cooking surface is 12" across with an 18" diameter including the controls and feet.


Here is everything removed from the box.  The most interesting thing to me is the wireless probe shown in front.  When paired to the cooktop and attached to a pot of liquid it is supposed to allow you to control the temperature of the liquid in the pot to +/- 1°f up to 375°f.  My original thought when backing the campaign was that it would be very useful for home brewing beer, during the mash you need to bring the pot up to a precise temperature and hold it there while the enzymes in the malt convert starches to sugars.  This should make that job much easier.  Sous vide cooking it another cooking method that could be performed with this piece of equipment, but I'll probably stick with my Nomiku for that.  I can see myself using it for deep frying, I do have a dedicated fryer, but it requires 5 liters of oil and is a pain in the arse to clean up.  That's fine if I'm cooking for a crowd but not worth the trouble if it's just for two ot three.  The Paragon cooktop will allow me to use whatever size pot is most suitable for what I'm making.  This should also shine at low temperature poaching in whatever liquid I want to use be it court bouillon, olive oil or even butter!  I have the probe charging now and hope to put the Paragon Induction Cooktop through its paces soon!

Friday, February 5, 2016

Sunrise Biscuit Kitchen Biscuits

A few years ago I had the TV on in the background while I was working on the computer, as I often do.  The program on at the time was "Food Paradise", a show on the travel channel that does short clips about various restaurants based around a particular theme.  An episode titled "Drive Thru Paradise" was on which highlighted places around the country that have outstanding drive-thru offerings.  One of the featured restaurants was Sunrise Biscuit Kitchen in Chapel Hill, NC.  I've never had the opportunity to try their biscuits myself, but as a southern transplant to a northern state anything biscuit related piques my interest.  As I was working on the computer I heard them go over their biscuit recipe, but I was unprepared and by the time I could grab a pen and paper it was over.  I searched on-line but the only version of the clip I could find omitted the recipe part, there seem to be several versions of Food Paradise's Sunrise Biscuit Kitchen clips but I never could find the one that included the recipe description.  Fast forward a few years and again I'm working on the computer with the TV on in the background.  Travel Channel is playing back-to-back-to-back episodes of Food Paradise and when the episode I saw a fews years back comes on I stop what I'm doing and get ready, just in case it's the version with the recipe.  And it was!

The recipe they gave is for a commercial size batch, it's also very short on details with only the list of ingredients and oven temperature.  The ingredients they listed are:

10 pounds flour
24 ounces margarine
1/2 gallon buttermilk
16 ounces water

I had to make a few assumptions about the ingredients.  Since no leaveners were listed I assumed the flour they used was self-rising, and since they are in the south I assumed they were using a soft wheat flour like White Lily (which was convenient since I had some White Lily self rising flour in the pantry!).  They didn't specify the margarine brand so I basically chose the one that was on sale that week (Blue Bonnet).  It has a pretty soft consistency which matched what was shown on Food Paradise.

The next step was to reduce the amounts to something more manageable.  First I converted the recipe to baker's percentages which came out like this:

100% Self rising flour
15% Margarine
43% Buttermilk
10% Water

For the first batch I went with two cups of flour, which is 226 grams, and calculated the rest of the ingredients based on the flour weight.  This resulted in a recipe consisting of:

226 grams Self-rising flour
34 grams Margarine
104 grams Buttermilk
22 grams water

The oven was pre-heated to 450°f.  Flour and margarine were weighed into a bowl, I rubbed the fat into the flour with my hands (they used a mixer for this in the clip) until it looked like cornmeal but with a few larger pieces still remaining.  The buttermilk and water were weighed, added to the fat/flour mix and everything was quickly mixed together with a spoon.  Once all the loose flour had been incorporated into the dough it was turned out onto a lightly floured surface, flattened and folded.  This was done three more times before the dough was flattened to about 1" thickness and biscuits cut out.  The biscuits were put on a parchment lined tray so they were just touching, the tops were brushed with a little buttermilk and put in the oven for about 15-18 minutes until the tops were browned.

The end result was a pretty damn good biscuit.  The repeated flattening/folding procedure produced some flakiness but the biscuit was sturdy enough to use for breakfast sandwiches or to douse with gravy.  I would probably add a little salt next time and I didn't get as much lift as I would have liked, probably due to the self-rising flour being a little old (about 10 months).  The oven temp could probably go up a little as well, next time I'll try 475°-500°f.  I'll have to try it with the locally available self-rising flour to see how that affects the final product.

I haven't had the opportunity to make another chocolate pie, but I still want to post the recipe.  May have to do so sans any pictures.  I've also just received a shipping confirmation for my Paragon Induction Cooktop, haven't decided for sure what I'm going to do with it first but I recently found a recipe for Nashville Hot Chicken so I'm thinking I may sous vide a chicken breast with the spice blend, bread it in seasoned flour and fry using the Paragon cooker.


Saturday, January 2, 2016

It's Here!: WiFi Nomiku Edition

My first real culinary immersion circulator was the original Nomiku, which I received from backing their first Kickstarter campaign.  Prior to that I was using an old surplus Fisher Scientific lab circulator that I had bought off Ebay and would constantly trip the GFCI if I plugged it in to a kitchen outlet.  I found the original Nomiku to be easy to use, well designed and had a lot of fun with it.  Later when Anova launched a Kickstarter for a bluetooth enabled Precision Cooker I jumped in for one.  The Anova Precision Cooker is a nice circulator but I found the bluetooth connectivity very limiting, to utilize the feature you have to be in close proximity and it's just as easy to adjust the settings on the circulator itself.  I liked the idea of being able to remotely control a circulator but wanted something that would allow controlling from further away than bluetooth would allow, so when Nomiku announced their new WiFi enabled circulator in mid August 2014 I was in.  As soon as I heard about the campaign I logged in to Kickstarter, made my pledge and became backer #40!

The original delivery date was in March 2015, but of all the projects I've backed on Kickstarter not a single one has shipped on time.  The original Nomiku was supposed to be delivered in December 2012, actual delivery happened quite a bit later than that but they did deliver so I wasn't too worried.  I'm happy to report that my WiFi Nomiku was finally delivered today!


When I opened the box I was surprised to find the circulator packed with a shirt, I had completely forgotten about that!  The box itself takes up much less space than the original model which should make it easier to store when not in use.

Here is the WiFi Nomiku attached to a 12 quart Cambro filled with 10 liters of water.  Unlike the original Nomiku (and the Anova Precision Cooker), the screen faces away from the bath.  This is something that several people had suggested when giving feedback about the original model and something I was pleased to see implemented.  The new model also doesn't have the external power brick that the original model had, I never minded it that much but others thought that it could be easy to inadvertently splash water on it damaging the circulator.  Local controls are pretty simple, there is a menu button below the screen to the left with a action button immediately the right.  Without reading the manual I was able to figure out how to connect to WiFi, entering the router password is a little clumsy since you have to scroll though all the lowercase letters to get to uppercase and scroll all the way through those to get to numbers/symbols.  It can take a while if your router password is strong with a mix of upper/lower case and symbols/numbers.  It would be nice if this could be done automatically like the Google Chromecast works.  Once the circulator was connected to WiFi I was having problems pairing it to my phone, I eventually had to uninstall the Tender app and reinstall.  After that it seemed to work fine.  Tomorrow when I'm out I'll see if I can turn the circulator on from standby and heat up the bath, the ability to have the bath already heated up when I get home from work will save me a lot of time!

The only testing I had the time to do today was to see how fast the WiFi Nomiku can heat up the water bath.  I filled the Cambro with 10 liters of cold tap water (I know, I usually fill it with hot but this was a test!), the initial temp was 52.4°f and I set the circulator to heat it to 130°f.  Yesterday I did the exact same thing with my Anova Percision Cooker, it took 50 minutes to go from the same starting temp of 52.4° to 130°, the WiFi Nomiku did the same thing in 27 minutes and 36 seconds!  Both baths were uncovered, I expect the time to go down a little once I cut the Cambro lid to fit the new circulator.

So far I'm really liking this new circulator, even without the WiFi connectivity it's a solidly build piece of equipment and I foresee it becoming my go-to circulator.  That being said, I think the clip could stand to be improved.  I've been thinking of a way to make a bracket that I could use to attach the circulator to the side of a beer cooler without having to make permanent modifications.  If I come up with something I'll put DIY instructions on the blog.