Showing posts with label nomiku. Show all posts

Thursday, April 27, 2017

It's Here!: ChefSteps Joule Edition

I started having problems with my WiFi Nomiku giving me erroneous low water alarms again.  This is the second or third unit I've had the same problem with.  I'm not sure why this keeps happening, maybe it's something with the water in my area or something I'm doing.  This last time it started happening after I added some vinegar to the bath to take out some scale that was building up (we have pretty hard water), the manual suggests using citric acid for that.  It's possible that the acetic acid in the vinegar is somehow damaging the water level sensor in the circulator, I'll try a few things to see if I can get everything working again before contacting customer service for another replacement.

Since I'm currently down a circulator I decided to finally try one I've been interested in for a while, but couldn't justify buying...the ChefSteps Joule.  Shipping was amazingly fast, I placed the order for the circulator directly from ChefSteps.com on Sunday and it arrived at my door (all the way from China) on Wednesday.

The Joule is different from my other circulators in that it has no manual controls on the unit itself, with the exception of a single button on top.  The circulator is controlled using an app installed on an Android or iOS.  My understanding is that it can use either Bluetooth or WiFi depending on the situation.  Pairing was pretty straightforward, after setting up the Joule in a bath and plugging it in I just opened up the app and saw a little button that said connect to Joule.  After pushing the button my phone connected to the Joule via Bluetooth and then a screen popped up asking me to select my WiFi network and ask for my password.  A few moments later and we were ready to go.  I pushed the power button at the lower right hand corner of the screen, selected the temperature and the Joule came to life!  At that time I had to leave, so I opened the app and turned off the circulator.  Just as we were about to return home I fired up the app again to see how controlling the circulator from afar via WiFi worked, I touched the power button and selected a different temperature than I had entered earlier to start up the Joule.  On the way home I received a push notification telling me that the bath had reached temperature and was ready to cook.  When we did arrive at the house I pulled out my Thermapen to check the bath temperature and it was spot on at 140°f.  I'll do some more playing around with the Joule tonight after work.  One thing the Joule can apparently do, but that I can't test out, is be controlled by voice commands using an Amazon Echo.  I may have to look at the Echo to see if there are enough other reasons to fork out the cash for one, for now I'll just have to stick to using the app.

Some initial thoughts...

Pros:
Very compact size for easy storage
Powerful heating element (1100 watts)
Water resistant (due to lack of manual controls)
WiFi and Bluetooth connectivity
Magnetic base to stick to the bottom of induction ready pots
Voice control option (with additional gadget)


Cons:
Lack of manual controls means you have to have an Apple or Android smart device to use.

That's pretty much all I can think of at the moment.  I'll have to see if requiring a separate device to use the circulator is a hassle, I have two other "connected" circulators (WiFi Nomiku and Anova BT Precision Cooker) that can be controlled via apps but I almost never use that feature, preferring to set the temperature using the manual controls on the units.  Having to use the app may take a little getting used to.

Friday, October 14, 2016

Brisket flat smoked in the Bradley Original Smoker

Since I bought my Bradley Original Smoker last year I've wanted to take a stab at brisket, but there was no way I could possibly justify buying a whole brisket when it is just two of us doing the eating.  The solution came when a nearby grocery store put brisket flats on sale.  The smallest one I could find was a 3.5 pound untrimmed flat, which was more than enough for me to play with.

It was a dark and stormy day when I originally planned on smoking the brisket, and since rain and electric smokers aren't the best of buddies I had to throw the meat in the freezer and wait for my chance.  That day came the next weekend, when it was dry out but much cooler.

I started out early in the morning, around 5:30 am.  First thing was to set up the smoker and get it warming up.  I had recently bought a resin horizontal shed for my Weber grill and smoker to live in, it works great and keeps everything dry but the tradeoff was that in arranging things so everything looked nice and tidy I made the outlet I usually use for the smoker inaccessible.  No big deal, there's another outlet a few meters away.  Unfortunately that outlet was dead so I had to run an extension cord to the other end of the patio.  Now that the smoker had power I put a foil tray of water in the bottom to catch the fat rendering off the brisket and went to the kitchen to prep the meat.

I made a rub consisting of roughly equal parts kosher salt and ground black pepper, about a tablespoon and a half.  To this was added 1/2 teaspoon granulated garlic, cayenne pepper and celery salt.  I didn't really need to trim any of the fat cap off, so I just cut a cross hatch to help the fat render away during cooking.  The rub was sprinkled evenly over all surfaced of the brisket.  I temperature probe was inserted in to the meat from the side until it was roughly in the center.


At 6:15 am we were ready to go.  Once everything was in place the temperature probe wire was threaded up through the smoke vents and attached to the thermometer.  The second wire seen that can be seen in the photo is the thermocouple attached to my PID controller.  I had the controller set to 250°f, but the tray of water I put in to catch falling grease really made it difficult for the smoker to reach temp.  The highest temperature the chamber could reach while the water tray was in place was about 220°f.  The alarm on the meat thermometer was set to 165°f and I went about my day, every few hours I would go out to check on things, add more bisquettes (I was using the Jim Beam smoking bisquettes for the most part) and make sure everything was working properly.  With the tray of water keeping the temperature down it took almost 10 hours for the brisket to reach the target temp of 165°f.  Now it was time to wrap.


I wrapped the brisket flat in parchment paper (for some reason you can't find plain butcher paper anymore, then wrapped everything up in aluminum foil.  Since there was no longer a danger of melting fat dripping down and starting a fire I removed the tray of water at this time as well and emptied the bowl of used bisquettes.  With the extra water out of the picture the smoker quickly reached the controller set point of 250°f and things moved quickly from there.  In less than 2 hours the brisket flat had made it to the final temperature of 195°f, was removed from the smoker and put in a beer cooler to rest.  195°f as the final temperature was pulled from a recipe online, I had seen anywhere from a low of 195°f up to a high of 204°f and decided to go low thinking that carryover would take the temperature up at least a few degrees.  I was wrong, because this was such a small piece of beef compared to a while brisket there wasn't much if any carryover.  To bring it up a few more degrees I ended up putting the wrapped brisket in a 200°f oven while I went down to the patio and got everything broken down and stowed away in the shed.

 Here's the final product, nice bark on the top but a little too salty.  Next time I'll have to go lighter on the rub.  The meat was moist and delicious, not quite as fall-apart tender as I would have liked but very good.  Next time I'll take it to a higher temperature, possibly 200° or  even a few degrees higher.

This turned out good, but I think I can make it great next time with a few minor tweaks.  I prepared the leftovers for freezing by vacuum sealing them and putting them in a 150°f water bath for a few hours with my WiFi Nomiku maintaining the temperature.  The packs were then chilled overnight before being thrown in the freezer.  It'll be much easier reheating brisket from the freezer this winter than freezing my butt off trying smoke another one during a Chicago winter!

Wednesday, March 2, 2016

72 Hour Short Ribs

Short ribs are one of the most transformative dishes you can make using low temperature cooking.  The technique allows you to transform the meat inn to something with the tenderness of tenderloin, but with the full beefy flavor of a tough cut of meat.  The results can vary depending on the time and temperature used, in the past I've gone for 72 hours at 55°C which resulted in pink, medium rare meat which still held its shape when cut.  This time I decided to go with the recipe found in Nomiku's Tender app, which used a slightly higher temperature (60°C) for the same amount of time.


The recipe calls for red wine to be bagged with the ribs, since I use a Food Saver I find the best way to do this is to freeze the wine first so it doesn't get sucked out of the bag while the vacuum is being pulled.  I added a little Worcestershire sauce to the wine and let it sit in the freezer for a few hours until solid.  The ribs were liberally seasoned with salt and pepper, I like the flavor a pre-sear brings to the game so I heated up a skillet with some beef tallow and browned one side of each shot rib.  Once they had cooled a bit I bagged the ribs with the wine cube, a roughly chopped stalk of celery, some carrot, a quartered small onion, two cloves of garlic and some fresh herbs.  The bag was vacuum sealed and placed in a bath with the Nomiku set to 60°C.  I had never used the timer function before so I set it for 72 hours, adjusted the water level and put the lid on the Cambro.  After 72 hours I kind of expected the Nomiku to reduce the bath temperature to 50°C for holding, but instead it just stayed at the 60°C and started counting up.  I set the timer manually, I believe it's possible to have the circulator lower to a holding temperature once the timer counts down to zero but you may have to set it using the Tender app for that functionality.  For a sauce I quartered some crimini mushrooms and browned them along with some onions.  I removed the ribs from the bag, poured the purge through a fine mesh strainer and poured it in to the mushrooms to deglaze the pan.  A sprig of rosemary was added along with a clove of garlic and the liquid was reduced until it became syrupy.  For sides I boiled some new potatoes and steamed some asparagus over them while they were cooking.

The ribs ended up with a consistency like they had been braised, but still nice and pink.  The fat was quite soft and melted away when bitten in to.  I would probably not use the same wine next time, we don;t drink a lot of wine so I used a bit of Merlot from a small single serve bottle I found in the cupboard.  It resulted in an off odor when the bag was opened, next time I'll probably omit the wine and just use some beef stock instead.  Reducing the purge with the mushrooms resulted in a really nice sauce so if I want some wine flavor I'll probably just add it there next time.  With those few tweaks I think this will be a go-to dish.

Wednesday, February 24, 2016

Sous Vide Nashville Hot Chicken


Nashville Hot Chicken is starting to become more and more available outside Tennessee, basically a highly spiced piece of fried chicken that after cooking is coated with a paste of cooking grease and hot spices.  While I've never had the chance to try it at the source we now have several places in Chicago that serve the dish.  Not too long ago I can across this article at Kentucky.com and decided I'd try to do my take on this regional specialty.

I made a spice blend based on the one in the article with a few minor changes based on what I had in the cabinet.  The blend I came up with is:

3 TB cayenne pepper
2 ts dry mustard
1 1/2 ts table salt
1 ts sugar
1 ts chipotle powder (didn't have any hot or smoked paprika)
1 ts black pepper
3/4 ts garlic powder
1/2 ts celery salt (mainly because I have a crap-ton of celery salt)

Because I had them I decided to use boneless/skinless chicken breasts.  I generously dusted all sides of the chicken with the spice mix before putting them in a gallon size Ziploc bag and letting them sit in the refrigerator for 24 hours.  The next day I filled a 12 quart cambro up to the 10 liter mark, attached the WiFi Nomiku and set the target temp to 150°f.  Once the bath was heated I put in the bag containing the seasoned chicken breasts and let them soak for 90 minutes.  When done the bag was removed from the bath and put in the refrigerator to chill.

Now it was time to play with the Paragon Induction Cooktop.  I figured I'd make some fries first to go with the chicken, I cut a russet potato in to batons and let them soak in cold water for about 10 minutes before rinsing several times.  About 6 cups of grease (corn oil with a little bacon grease) was put in a 3 quart sauce pan and the wireless probe put in place.  The potatoes were drained, patted dry with paper towels and put in the cold oil.  Finally the Paragon temperature was set to 370°f, rapid precision mode selected and the unit turned on.  Once the oil temp got over 212°f I switched to gentle precision mode and made sure to shake the pan every two minutes or so to keep things from sticking together.  This method worked pretty well, however as you can see in the picture there were a few fries in contact with the bottom of the pot initially which caused to brown a little before the others.  I may look in to using a small, round cooling rack next time to keep them from coming into contact with the bottom next time.

Now on to the chicken.  A two stage breading station was setup with plain flour on one side and a mixture of buttermilk, the spice mix and some of the purge from the cooking bag in the other.  One of the cold chicken breasts was first dredged in the flour, then coated with the buttermilk mix and then back into the flour.  Once everything was nice and coated it was allowed to rest on a piece of parchment paper while the oil got back up to temperature (which doesn't take too long for that small quantity of oil in rapid precision mode).  The chicken was carefully lowered in to the oil and cooked until the crust turned a nice golden-brown color.  Since the meat was pre-cooked there was no reason to worry about the internal temperature reaching 165°f, it just needs to be heated through.  I turned the chicken breast once, which can be a little tricky in such a small saucepan so care is needed to prevent being splashed with boiling hot oil.  Once done a tablespoon of the hot oil was added to about the same measure of the spice mix and used to coat the chicken breast.

The chicken had great flavor and the sous vide fried chicken method ensures that the meat remains tender and juicy.  I could have done with a little more heat, next time I'm at the store I'll need to pick up some hot paprika to try and dial it up a bit.  All in all a successful first attempt, but still room to tweak the recipe.  I'll have to stop by Gus's Fried Chicken for some authentic inspiration!

Monday, July 6, 2015

July 4th Menu

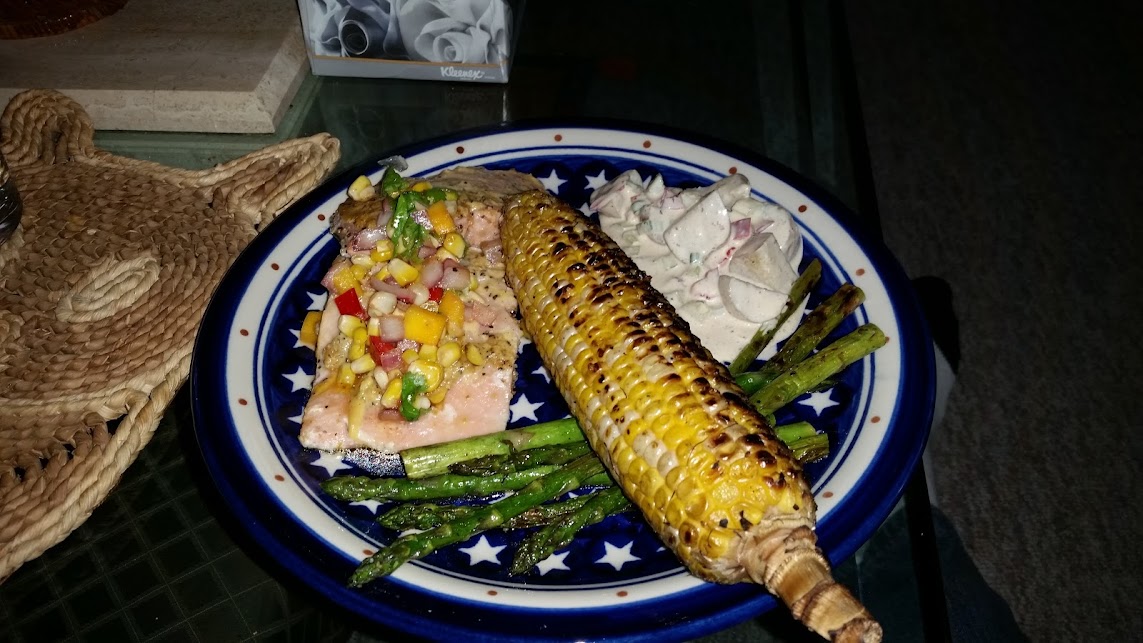
For the 4th this year the menu included cedar plank salmon with grilled corn/mango salsa, sous vide potato salad, grilled asparagus and grilled corn.

The only salmon I had access to was pre-portioned, frozen the individually vacuum packed.  I placed the packets in a 125f water bath for about 45 minutes to thaw and get up to temperature, next time I'll probably go a little lower (like 115f-120f).  The salmon was then put in the refrigerator until time to grill.  I placed the salmon fillets skin side down on a soaked cedar plank, spread some honey Dijon mustard on the top, sprinkled with lemon pepper and topped with a slice of fresh lemon.  The grill was set up with a standard two level fire, the plank was put over the hot side until it started to smolder, then moved to the cool side.  Since the salmon was already cooked I just needed to let it heat through and absorb some of the grill flavor.  Once done I topped with a grilled corn/mango salsa consisting of some previously grilled corn, diced mango, diced red onion, diced hot red pepper, cilantro, lime juice, salt, pepper and olive oil.

The potatoes for the potato salad were cut in to pieces, tossed with salt, pepper and champagne vinegar and vacuum bagged with a knob of butter.  They were cooked in a 185f bath for about 3 hours, I kind of got distracted and forgot about them for a bit so they were in the bath longer than intended but doneness turned out great.  They were chilled overnight and mixed with the dressing and other ingredients a few hours before serving.  The dressing consisted of mayonnaise, balsamic vinegar, champagne vinegar, celery salt, black pepper, chili/garlic paste, diced celery, thinly sliced radish and thinly sliced green onion (white and green parts) along with red pepper left over from the salsa.  I dumped the potatoes in the bowl where I had mixed the dressing and folded them in, next time I'll dirty another bowl so I can put in just enough dressing to coat the potatoes, these were a little over dressed.

The other sides were grilled asparagus (tossed in olive oil, salt, pepper before being grilled) and grilled corn (just soaked for a few hours before going on the heat to get a char).  Both turned out great.

Dessert was an apple pie from the Hoosier Momma Book Book of Pie cookbook, I picked it up a Costco last year when the author was signing copies.  Turned out great!  It was served with a vanilla/caramel gelato.


Monday, February 16, 2015

Crock fermented, low temperature processed dill pickles


This was a project 6 weeks in the making.  A while back I stared making naturally fermented sauerkraut in glass jars, and since that was working out so well I had the urge to take things to the next level.  The opportunity came around Christmas, when I received some Amazon gift cards and decided to use them to buy my own stoneware fermentation crock.  The crock I selected has a 5 liter capacity, straight sides, stone weights and a water channel around the lid to help keep out oxygen while the fermenting is going on.  The first thing I tried was sauerkraut, and it turned out OK but not great.  After doing a little on-line research I believe that the issue is that I didn't fill the crock with enough cabbage, which left a large air space in the crock above the weights.  Next time I'll shred up two heads of cabbage and see out it turns out then.  I also read about a method of making sauerkraut where you ferment the head of cabbage whole in a brine and then shred it, might be interesting to try but I'll probably wait until it's a little warmer out to give it a try.

One of the things I've always wanted to try but never did was to make my own fermented dill pickles.  The process is simple, you take cucumbers, put them in a crock with herbs, spices, and a brine, then wait.  I looked around and found several recipes but was confused about the amounts, they all measured the salt in volume instead of weight and none specified what type of salt was used.  In the end, I assumed they were using pickling salt, found a weight for a given volume of salt on the Morton website and calculated the weights I would need.

The first step was to measure out all the ingredients I would be using.  The recipe called for 8 cups of water (Brita filtered), 1/4 cup white vinegar (5% acidity), 144 grams of kosher salt, 2 TB dill seeds, 2 TB yellow mustard seeds, 4 TB pickling spices mix (Spice House), 4 cloves of garlic, a dried chili and a couple sprigs of fresh dill.  The water, vinegar and salt was mixed together until dissolved, this resulted in a brine of about 7.4%.  I saw recipes using brines anywhere between 2.5% and 10% so this seemed like a reasonable level.  While the salt was dissolving I washed the pickling cucumbers and cut 1/4" off the blossom end, I read that if this isn't done enzymes present in that area will cause the pickles to get mushy.  The while spices were toasted briefly to wake them up and places in the bottom of the crock, then the cucumbers were packed in tightly (to help prevent them from floating), garlic and fresh dill places on top of the cucumbers and the stone weights added.  Next the brine was poured over and I shook the crock a little to let any trapped bubbles rise to the surface.  Once the lid was put on some watter was added to the channel to seal the crock but allow produced gasses to escape.  The crock was put aside in a cool corner and left alone to allow the magic to happen, a few times a week I would add water to the channel to keep the crock sealed.

The recipe I used said it would take anywhere between 4 and 6 weeks of fermentation before the pickles would be ready.  How long the fermentation takes depends on the strength of the brine, a weaker brine of about 2.5% can give you what are known as "half-sour" pickles after as little as a week of fermentation.  A stronger brine will inhibit both the types and rate of bacterial growth, which requires a longer fermentation and will result in what are called "full-sour" pickles.  After 4 weeks I opened the crock and pulled out a pickle to try.  The first thing I noticed when cutting up the cucumber
was that it wasn't completely pickled through to the center, it needed a little more time to finish.  The flavors were good, but I found the pickle to be a little too salty for my taste.  I added another cup of filtered water to the crock to reduce the brine concentration to around 6.6% and closed it up for another 2 weeks.

This past weekend it was finally time to open up the crock and process my pickles for storage.  Pickles will lose their crispness if they are heated to above 85C (185F), the temperature at which the natural pectin will start to break down.  Normal canning procedures where you process in boiling water will result in a limper pickle, so I opted to go with a lower temperature process using a water bath maintained at 180f with my Nomiku immersion circulator.

Here you can see the crock sitting next to a stockpot where I'm sterilizing jars for canning.  Apparently some of the brine was able to seep through the walls of the crock and evaporate, leaving a salt residue on the sides.  Hopefully this will provide a safe haven for the good bacteria to sit between fermentations so future batches will just get better and better.  The cucumbers here removed from the brine, cut in to spears (quarters) and packed in to sterilized jars.  Each jar received another teaspoon of mixed spices (dill seeds, mustard seeds, chili flakes, pickling spices) and a clove of garlic.  Brine from the crock was ladled in to the jars to about 1/2" below the rim and the lids placed on loosely to allow gas expanding during the heating to escape.


Here is the bath set up with the Nomiku for processing.  It's difficult to see in this photo, but I am using a cork from a bottle of wine to raise the circulator so the top of the jars falls between the Nomiku's max and min level markers.  Once the jars were placed in the bath container I added just enough water to bring the level up to about 1/4" to 1/2" below the top of the jars, the Nomiku was set to 82.2C (180F) and turned on.  I placed the lid on the bath container to help keep in the heat and the jars were allowed to process for a few hours.  Once I was sure that the contents of the jars had reached 82.2C and held there for 30 minutes I removed each jar from the bath, tightened the lid and put it back in the water.  I now added additional water to the bath to raise the level above the tops of the jars.  This was done to kill any bacteria that might have been survived by being above the water level during the first phase of processing.  after 20 more minutes in the bath the jars were removed to a cooling rack, as the jars cooled the centers of the lids popped down indicating that a good vacuum had formed.  These should be shelf stable for a good long time, but I don't intend to allow them to sit around for long.

The pickles are very good and still have a nice snap to them, unlike the quick pickles I'd made in the past.  I still find them to be a bit on the salty side, even after diluting the brine down to 6.6% after week 4.  Next time I'll try using a 5% brine and see how that turns out, I expect the weaker brine will cut the fermentation time down by a few weeks.  Before I make another attempt I'm going to do some research and try to come up with my own blend of pickling spices, the ready-made mix I used for this batch is more for corned beef than dill pickles.


Thursday, October 16, 2014

It's Here!: Searzall Edition

I've been listening to Dave Arnolds "Cooking Issues" for a few years now and had heard him talk about the torch attachment they had been developing on the show, so when he announced that they were launching a Kickstarter campaign to I jumped in.  Today it arrived and I wanted to try it out!

The Searzall was packaged in a small box along with some hardware and literature.

Here is everything unpacked.  Included in the box is the Searzall attachment, a spare set of screens, an allen key, limited warranty sheet, initial set-up instructions and a user guide.  Also included is a small wooden stick, which confused me at first but made sense once I had read the instructions.  There is also a torch head adapter which was already inserted in the Searzall.


Here is the Searzall attached to my torch.  In anticipation of the arrival I had purchased the recommended torch head, a Benzomatic TS8000, a few months ago.  Mounting the searzall was extremely simple, since the adapter was already installed (there is a thumbscrew to secure it in place) I just slipped the attachment on to the end of the torch.  This is where the wooden stick comes in to play, you insert the stick between the tip of the torch head and the searzall to ensure proper spacing between the two, there should be a 1/8" gap.  The Searzall is then secured by tightening a lock nut with the provided allen key and the stick removed (and stored in a safe location for future use!).  The instructions at this point are to ignite the torch and position the Searzall with the screens pointing directly at the floor at a height of at least 4 feet for two minutes.  The metal will glow red during this initial burn-in.


Here's a shot with the screen still red hot.  It took about 7-8 minutes for the metal to cool to the pint it could be handled, but this thing gets HOT, so an abundance of caution is called for.  I tried to get a temperature using an infrared thermometer but the temperature exceeded its range (550 C).


Finally I was ready to use the Searzall on some food.  I've been trying to lose a little weight before the holidays so on the weekends I cook a lot of protein and sides, portion them to get the calories I want, vacuum seal the meal together and freeze.  For tonight I pulled a sous vide pork chop with Brussels sprouts and new potatoes.  The pouch was rethermed in a water bath heated by my Nomiku, removed and de-bagged.  I patted as much moisture off the pork as possible and went to work with the Searzall, which gave me a really nice crust.  I then went to town on the sides...

Getting a little char on the vegetables was a piece of cake!  This weekend I plan on using the Searzall quite a bit while making meals for the next week, it will be a lot easier (and cleaner) than searing my proteins in a skillet like I have been doing.  This is going to be an extremely useful tool!

Thursday, September 18, 2014

Whole roast chicken sous vide.

From time to time I like a good roast chicken for dinner, so when I was walking through my local supermarket recently and saw they had a sale on whole chickens I picked one up.  This was kind of an impulse buy so I really didn't have a plan and I was looking at a pretty bust week ahead at work so I needed to think of a way to get most of the work done ahead of time so I could quickly finish the cooking when I got home.  Sous vide turned out to be the answer.

The first part of the cooking was done on a day I wasn't working.  Everything in the cavity was removed and the chicken was rinsed and patted dry.  I mixed together some salt, pepper and poultry seasoning in a small bowl and generously seasoned the cavity and outside of the bird, then stuffed the cavity with some Land O' Lakes garlic herb butter, rosemary and quarters of onion.  The whole chicken was slid in to a Foodsaver bag I had cut earlier and vacuum sealed (a bird bigger than 4 pounds would have probably been too big for the bag).  Prior to prepping the chicken I had set up my Nomiku on a 12 quart Cambro with the bath filled up to the low mark on the circulator and set the temp to 62.8C (145F).  Adding the bagged bird to the bath brought the water level almost up to the high level mark on the circulator, I put on the lid and let the chicken soak for 6 hours while I went about my day.  After the soak I let the chicken cool down for 20 minutes at room temperature, then chilled down completely in an ice bath before throwing in the refrigerator.

A few days later it was time to finish the chicken.  When I made it home I placed the bagged chicken back in to the bath with the temperature set to 60C so it could start to re-therm while the oven heated up to 475F (convection).  I placed a bunch of asparagus in the bottom of a casserole dish with a cooling rack on top.  The chicken was removed from the bag and placed breast side down on a piece of parchment paper on top of the rack, all the juices from the bag were poured over the asparagus.  As you can see below, it was a little on the pale side. 


 The bird was patted dry with paper towels and placed in the oven for 10 minutes for the first side to brown, I also did a few minutes under the broiler to speed things up.  After turning the bird breast side up it was returned to the oven for another 10 minutes followed by a little time under the broiler.  Here is the final result...


All of the white meat was perfectly cooked and wonderfully juicy.  The dark meat good but a little on the red side for some tastes.  Next time I may break the chicken down and cook the white and dark meats separately at different temperatures.  The asparagus cooked in the bag juices under the chicken was amazing.

Monday, September 8, 2014

Busy summer, hope to start posting more often soon.

Its been a busy summer and again I've neglected this blog for far too long.  The next few months should give me lots to write about, I should be receiving three items from Kickstarter campaigns I funded.  Within a few week my Searzall should arrive.  To get ready for this I went and purchased the recommended torch head to replace the really cheap one I originally bought at the hardware store to make creme brulee.  This should come in handy this winter when I won't be able to fire up the grill to sear my sous vide cooked steaks and chicken.  Next month (or soon after) I'm expecting my Anova Precision Cooker to be delivered.  I love my Nomiku but I've heard good things about Anova so when I had the chance to grab one at the $99 level I jumped at it, never can have too many circulators!  A little further down the road (estimated March 2015) will be the next iteration of the Nomiku!  This kickstarter is still ongoing for the next few days so if you want a great circulator at a good price go there now!

With the exception of Labor day I haven't really been cooking anything new.  I have been experimenting with different times and temperatures for eggs, the yolk of a 63C egg if perfect but the loose white is a turn off for me.  So far I've tried 75C for 13 minutes, which is nice but the yolk just isn't the same, and dropping a 63C egg in to simmering water long enough to firm up the white.  I think the latter technique will work best but I'm still trying to figure out how long it takes to get the firm white I want without overcooking the yolk.

I was able to play around a bit on Labor day.  Both the potato salad and asparagus were cooked sous vide at 85C for 45 minutes.  In the past I've soaked asparagus at 90C for 10 minutes, I think the lower temperature and longer time gives a better texture to the finished product.  For the potato salad I tossed the potatoes in a mixture of Dijon mustard, dill pickle juice, salt, pepper and some dried dill.  This was sealed in a vacuum bag and cooked along with the asparagus.  The next day the potatoes were mixed with some diced onion and bell pepper, sliced asparagus and Mexican sour gherkin cucumbers that we had.  I added a little mayo to half of the potato salad and left the rest mayo free for those who didn't want the extra fat.  Both were excellent, this really is the best way I've found to cook  the potatoes so they are complete permeated with flavor.

We were having polish sausages as the main course, so I wanted to make one more thing... really good sausage rolls.  I'm a fan of New England split top rolls, the kind that are used for lobster rolls on the east coast, but they're a little hard to find in Chicago.  I've grown fond of a recipe in an old King Arthur Flour catalog to which I've made a few changes.  I prefer my bread doughs to have a long, cold fermentation in the refrigerator instead of letting them ferment at room temperature, I find the long ferment allows better flavor development, improved texture and makes the dough easier to work with.  To do this you just need to decrease the amount of yeast in the formula, I halved the yeast in the original recipe for these rolls.  This technique is particularly good for pizza dough, it not only gives you a great yeasty flavor in your crust but the dough is also much easier to stretch out.  But the main advantage to this technique, and the reason that most pizzerias use it, is that it significantly increases the window in which the dough is usable.  My dough is ready to go after 24 hours, but it will keep in the fridge for up to 5 days and still give me a great crust.  The one disadvantage is that you can't just use the dough right out of the fridge, it needs to warm up first before being shaped.  In the past I've just left it sitting on the counter for a few hours but this time I still had the Nomiku set up on the water bath from the day before so I thought I try something new.  The dough had been cold fermenting overnight in a large zip-lock freezer bag.  I set the temperature of the water bath to 35C and forced as much gas out of the bag as possible, closed it and clipped it to the side of the bath.  After 7 minutes the bag had started to float due to the gasses being produced by the yeast, I flipped the bag over and let it go for another 7 minutes.  Using the Nomiku I was able to bring the dough up to temperature in around 15 minutes, something that usually takes well over an hour!  This is going to open up a lot of possibilities for week-night baked goods!

Wednesday, March 26, 2014

Naturally fermented sauerkraut at home.

I had half a head of cabbage left over from St. Patrick's day this year and needed to find a good way to put it to use.  Normally I would just fire up the grill for a cook-out and use the left over cabbage for some slaw, but this year spring seems to be having a difficult time getting started.  Instead of waiting for a warm day I decided to turn the cabbage in to fermented sauerkraut.  

The ingredient list is short...


1/2 head cabbage
2 tsp kosher salt


Several recipes also included caraway seeds as an option, but I couldn't find the ones I was sure I had in the pantry so I substituted 1/2 tsp dill seeds.  Remove any dirty outer leaves from the cabbage but don't wash, you need the bacteria naturally present to do the fermenting.  The first step was to remove the core from the head of cabbage and cut in to 1/8" strips.  That was placed in a bowl and the salt sprinkled over top.  Using gloved hands the salt was mixed and massaged in to the cabbage and allowed to sit for about 10 minutes for the liquid to start coming out.  While that was happening I sterilized a 1 quart mason jar (and a canning funnel) in boiling water.


While the jar was cooling a bit I went back to the cabbage and mixed in the dill seeds, then started loading it in to the jar using the canning funnel.  When the jar was filled almost to the top I took a small juice glass and used it to push everything down in to the jar, then continued adding more cabbage.  Eventually all the cabbage fit in the jar, so I added some water to the juice glass and covered everything with a towel secured with a rubber band to keep anything from finding its way in.  I went back about once an hour the rest of the night to pack the cabbage down in the jar, by the end of the night enough juice had been exuded from the cabbage to submerge everything.  By the next morning it was obvious that something was happening, there was a slight vinegary and lots of bubbles were coming up from the cabbage.  Over the next week the jar was allowed to sit out at room temperature covered with a towel.  Twice a day the fermenting cabbage was packed down in to the jar using the juice glass to make sure everything stayed submerged in the juice.  At day 5 I pulled a little out with a fork and tried it, it was good!  Finally on day 7 I figured it had had enough time so I loosely put a lid on the jar and put it in the fridge.


The results are fantastic.  The sauerkraut is nice and tangy, but unlike the stuff you get the the grocery store it still has a lot of crunch.  Since it's fairly acidic I would guess that the shelf life is decent, but I'm thinking I may vacuum seal some and pasteurize in a water bath using my Nomiku, I figure 140F for 90 minutes would kill off any pathogens but still retain the crunch of the cabbage.  Now I just need some warm weather so I serve this with some grilled sausages!

Wednesday, March 19, 2014

Sous Vide Corned Beef for St. Patrick's Day.

I've been having fun laying with my Nomiku immersion circulator, so I decided to put it to good use for our traditional St. Patrick's day meal.  We usually cook the corned beef, the centerpiece of the meal, in the crockpot for about 10 hours.  The result is very tasty, but leaves something to be desired in the texture.  It is usually falling apart and kind of stringy by the time we get home, or if we cook at a lower temperature it may still be tough and dry.  This year I decided to cook the corned beef sous vide.

There are several recommended time/temp combinations for corned beef on the internet, from 82C for 10 hours to 58C for 72 hours.  I decided to cook ours for 48 hours at 64C, which fit the best in to my schedule. Because I had a rebate check for Costco we picked up a corned beef (Sy Ginsberg brand) there along with a second component of my plan...a case of guinness.

Corned beef in water bath with frozen Guinness/spice puck still visible.
The first step was to make a guinnesscicle, I poured about 2/3 cup of Guinness in to a plastic container, added a tablespoon of corned beef spices I bought from The Spice House, sealed it up and put it in the freezer.  The next day it was frozen solid and ready to use.  I filed up my 12" x 18" x 9" polycarbonate box with hot water from the tap, the minimum and maximum levels are written in Sharpie on the box so I filled it to about an inch below the max level and attached my Nomiku.  After touching the screen to turn it on I set the temperature to 64C and left it to heat up.  Meanwhile I removed the corned beef from its packaging and rinsed off as much of the salty brine as possible.  Because we would not be doing the traditional cooking method of simmering in lots of liquid I wanted to eliminate as much of the salt as possible.  Once it was rinsed and patted dry I put the Guinnesscicle in a vacuum bag along with the corned beef and sealed it up.  In the picture above you can see the still frozen Guinness in the bag.  The bag was put in to the bath and the waiting began.

Nomiku screen with "Power Outage" icon displayed.
During the soak an unusual thing happened... the power went out.  I say that it's unusual because this is only the second time in the 15 years we have been living in this house that I can remember a power outage.  It happened on Sunday while we were all at home and only lasted about 10 minutes.  I found it interesting because it showed off a controversial feature on the Nomiku that I had never tested, if the power goes out the Nomiku will remember the set point and resume once the power is restored.  When this happens an icon lights up on the screen to alert you of the outage.  I say it's controversial because it can be a food safety issue, if the power goes out while no one is around and stays out long enough for the bath temperature to drop in to the danger zone (between 4C and 49C) it could allow harmful bacteria to grow unchecked.  If you don't notice the icon you could end up serving dangerous food.  The way I see it is by resuming after a power outage and letting me know that there was one I get to decide if there is a risk, and take the appropriate actions.  If the same outage had happened while we were all out at work and I was using a circulator that didn't resume afterwards then food that would have been otherwise fine would end up getting spoiled and thrown away.  It would be REALLY nice if the Nomiku folks could add a feature that not only will tell you that there was an outage but also what the bath temperature was when the power was restored, that way you could make an informed decision.  In the meantime I'm looking at buying a digital aquarium thermometer that has min/max capability like this one here.

St. Patrick's Day dinner
Now on to St. Patrick's day.  When I got home from work I pulled the corned beef out of the bag and allowed it to cool in the bag for about 10 minutes.  During that time I quartered some new potatoes and sliced half a head of cabbage in to 1/2" thick slabs.  A corner of the bag was cut off so I could pour off the juices (and there were a lot) through a strainer and in to a sauce pan.  To those juices were added the potatoes and carrots with the cabbage lain on top.  The lid was put on and the flame set to low, after about 15 minutes everything was cooked and we were ready to eat our St. Patrick's day meal with some soda bread and Guinness.  The corned beef was excellent, tender but not falling apart with strong flavors and not too salty (thanks to the rinse).  I don't have a picture, but for dessert I made an Irish Cream bread pudding served with some Guinness caramel.  I'll post those recipes in a future entry.  With the leftover half of cabbage I'm making some home fermented sauerkraut, we'll see how that goes in a week or so.

Thursday, December 26, 2013

Christmas Dinner

Been a while since I've posted.  I've been using my Nomiku often and loving it!  On Thanksgiving we did a sous vide turkey breast along with all the traditional fixings which all turned out excellent!  We've also been making chicken breasts, steaks and some vegetables sous vide.

For Christmas I decided to use a beef tenderloin that I vacuum sealed and froze last christmas, I've been trying to use some of the stuff that's been accumulating in our freezer.  To make it more "christmasy" I decided to butterfly the roast and fill it with sauteed garlic spinach.  The process was pretty simple, first I sauteed down some spinach by sweating a minced clove of garlic with some pepper, then adding fresh spinach and cooking it down.  Once done the spinach was dumped in to a colander and allowed to drain a bit while I  butterflied the tenderloin.  This portion of tenderloin was already a bit flat due to the vacuum sealing and freezing, so I just cut it about half way down stopping about an inch from the other side.  I opened it like a book, covered with plastic wrap and used a meat mallet to flatten to a uniform thickness.  Salt and pepper was sprinkled on the meat, then a layer of the garlic spinach.  The tenderloin was then rolled up and tied to keep the spinach inside, then I tried to stuff any stuffing that squished out back in the sides of the roast.  I seasoned the outside of the roast and vacuum sealed it along with a few tablespoons of butter.  This was cooked in a 56.7C bath for about 90 minutes, then allowed to cool in the bag for 10 minutes before being debagged and seared on all sides in a hot pan.

For sides we did potatoes dauphinoise, roasted brussels sprouts with smoked roasted red pepper and a salad.  Potatoes dauphinoise is one of the easiest dishes I know of that always gets raves.  It's just potatoes sliced on a mandolin and cooked in cream that's been seasoned with salt, white pepper and minced garlic.  For this time I added some minced onion and topped it with parmesan cheese.  I like to cook it in a shallow casserole to maximize browning.  For the first 30 minutes the potatoes are cooked in a 350F oven covered with foil, then the foil is removed and they cook until the top is nice and browned.  Sometimes I'll increase the oven temp to 400 to speed up the browning process.

The brussels sprouts are based on a recipe I saw on a cooking show earlier this year.  I cut off the stem end of the sprout and then cut it in half lengthwise, then they're put in a bowl of cold water to soak for a bit.  When I'm ready to cook I drain the soaking water, add salt, pepper and olive oil then toss to evenly distribute the seasoning.  The brussels sprouts halves and arranged on a baking sheet cut side down, covered in foil and then put on the top shelf of an oven preheated to 500F degrees for 10 minutes.  At that time the foil is removed and the sprouts are roasted for another 10 minutes until they start to brown.  To add a little christmas color I roasted a red bell pepper, allowed it to steam a bit in a covered bowl and then removed the skin.  The pepper was cut in to 1/2" by 3/4" pieces and placed back in the bowl, then covered with plastic wrap and smoked using my Polyscience Smoking Gun loaded with apple wood chips before being allowed to sit covered for 5 minutes to absorb the smoke flavor.  The smoked, roasted red pepper pieces then tossed with the roasted brussels sprouts.  My original intention was to try and mimic the taste of Brussels sprouts and bacon and this was a pretty good attempt, I'll be refining this recipe and pulling it out for cold weather dinners often.

Next time I'll try to get some pictures!

Monday, October 7, 2013

My first Nomiku meal!

My first Nomiku centric meal.  The chicken breast, carrots and potatoes were all cooked with my new Nomiku.  For the chicken breast, I made a marinade with equal parts ponzu, soy sauce and fish sauce.  To that I added some powdered ginger, granulated garlic and seasoned pepper.  The carrots were peeled and bagged with some dill weed, lemon zest salt and butter.  For the potatoes I just cleaned them and bagged with crushed garlic, butter, salt and pepper.  I pierced each potato with a fork to allow the flavor to penetrate.  The carrots and potatoes were cooked at 85°C for 45 minutes, then allowed to cool for about 10 minutes before being put in an ice bath to chill.  Later in the day, the chicken breasts were cooked at 65.6°C for 45 minutes.  After the chicken was removed to cool the carrots and potatoes were put in the bath to retherm.  To serve the carrots and potatoes were put on a foil lined baking sheet and roasted in a hot oven to dry out a little.  The chicken breast was put over a screaming hot charcoal fire to sear.  Also served was some freshly baked bread (100% flour, 66% water, 2% honey, 0.75% active dry yeast, 2% salt) and grilled portobello mushroom caps that were doused with olive oil, balsamic vinegar, salt and pepper and cooked on the grill.  Since it is fall I grabbed some oak leaves from the patio and threw them on the fire to smoke the mushrooms.  Very nice meal!

Wednesday, October 2, 2013

Nomiku Immersion Circulator

I was first introduced to sous vide back in culinary school, but it wasn't quite the same technique that's popular today.  Sous vide is french for "under vacuum", and what they covered in class was the "boil in bag" method of vacuum packaging pre cooked items at a central commissary to be reheated on site by immersing the bags in simmering water, unbagging and plating.  The sous vide technique that's popular today is a low temperature cooking method where items are vacuum bagged in a raw or almost raw state and cooked by immersing in a water bath maintained at a precise temperature using rather specialized equipment.

Back in 2009 I first became interested in playing around with the low temperature version of sous vide.  I started lurking around on Ebay until I was able to pick up an old Fisher Scientific immersion circulator in 2010 at a good price.  It was pretty dirty when it arrived and needed a lot of TLC to get working.  I took everything apart, cleaned all the electrical connections, descaled and scraped off a lot of gunk and was rewarded with a (mostly) working immersion circulator.  I say mostly because there is some issue that I haven't been able to remedy which causes the circulator to trip any GFCI protected outlet, like all the outlets in the kitchen.  Because of this I had to do all my sous vide cooking out in the dining room.  I wanted something a bit more reliable and modern, but new immersion circulators suitable for kitchen use were all in the $500-$1000 range.  That changed in June 2012 when a Kickstarter campaign started for a low cost immersion circulator for the home cook called the Nomiku.  For a mere $299 contribution a backer would receive one of the first Nomiku units, which were supposed to ship out by November 2012.  I jumped at the chance, knowing that there was no guarantee I would ever see anything.

The Nomikus were originally estimated to ship in November 2012, but that month came and went with no Nomiku.  The founders of the company had to deal with repeated delays, changes and roadblocks along the way but they persevered, and on October 1st I came home from work to a brand new Nomiku sitting on my doorstep!


The Nomiku is a much more attractive circulator than my old Fisher Scientific model, it consists of the circulating/control unit and a separate power supply.  In the box is a user manual, an illustrated "getting started" sheet and a sous vide primer.  The circulator feels solidly built, the only thing I noticed was that the green ring that you rotate to set the target temperature seems a bit loose but that seems to be by design.  I grabbed a large stockpot (about 28 quart capacity), attached the Nomiku and started filling until the water level reached the "Max" level indicator on the stem of the Nomiku.  That took 14 liters of water.  Normally I would fill the bath with hot water from the tap, but since I wanted to stress the unit to shake out any bugs I used cold water (about 20°C).  The reason I like to stress new equipment is that it allows my to find any faults early on that may require the item be replaced while still under warranty.

As the inaugural dish I decided to make sous vide carrots, this required a 90°C water bath that should be the hottest I'll ever need.  After filling the bath with the 14 liters of 20°C tap water I plugged in the Nomiku and tapped the screen to turn it on.  The desired bath temp is set by rotating the green collar around the screen, which I did until the display showed 90°C.  It took a LONG time for the bath to heat up.  At the 2 hour mark we were just getting up to around 76°C, so I tried to improvise a lid to help reduce the effects of evaporative cooling.  That helped, but I needed something a bit more effective so I ended up covering the pot with s sheet of aluminum foil and covered that with a dish towel.  That turned out to be effective and by the 2 hour 40 minute mark the bath had reached the desired 90°C temperature.  I made a simple preparation of carrots, just the vegetable, some butter, a little cumin and salt.  This was bagged using a Food Saver Vacuum Sealer and dropped into the bath for about 20 minutes.  As long as I had the foil top on the pot the Nomiku was able to maintain the bath temperature within +/- 0.1°C of the target point, I could see the light over the stove dimming as the heating element cycled.  Once the 20 minuted was up the bag was removed from the bath and I lowered the set temperature on the Nomiku to let it start cooling down.

If you've never tried sous vide carrots I suggest you give them a try.  The technique allows all their natural sweetness to some out and they retain an intense flavor.  The Nomiku performed like a champ, I think I can definitely get by with a smaller bath size for most applications and finding a bath container with a cover that I can cut to accommodate the circulator unit will help reduce the energy spent maintaining temperature.  Since I will be able to use my Nomiku in the kitchen I'll be able to pre-heat the bath water rather than let the circulator do that extra work on its own.  Now that I have a circulator that is so much easier to set up that my old one I'm going to be able to really play around with sous vide cooking.

One of the things I often hear from people is that sous vide cooking of meats is dangerous because you aren't raising the internal temperature to what the USDA recommends.  People need to understand that the USDA recommendations are based on a short exposure time at that temperature while pasteurization is a function of both temperature AND time.  A longer exposure at a lower temperature will kill pathogens just as well as a short exposure at a higher temperature.  Douglass Baldwin has an excellent sous vide guide including pasteurization tables located here.

Visit the Nomiku website for more information.

Edit:  I heated up another bath of 14 liters from 20°C to 90°C with the pot covered in foil and a dish towel from the start, this knocked almost an hour off the heating time (1 hour 45 minutes down from 2 hours 40 minutes).