Saturday, January 2, 2016

It's Here!: WiFi Nomiku Edition

My first real culinary immersion circulator was the original Nomiku, which I received from backing their first Kickstarter campaign.  Prior to that I was using an old surplus Fisher Scientific lab circulator that I had bought off Ebay and would constantly trip the GFCI if I plugged it in to a kitchen outlet.  I found the original Nomiku to be easy to use, well designed and had a lot of fun with it.  Later when Anova launched a Kickstarter for a bluetooth enabled Precision Cooker I jumped in for one.  The Anova Precision Cooker is a nice circulator but I found the bluetooth connectivity very limiting, to utilize the feature you have to be in close proximity and it's just as easy to adjust the settings on the circulator itself.  I liked the idea of being able to remotely control a circulator but wanted something that would allow controlling from further away than bluetooth would allow, so when Nomiku announced their new WiFi enabled circulator in mid August 2014 I was in.  As soon as I heard about the campaign I logged in to Kickstarter, made my pledge and became backer #40!

The original delivery date was in March 2015, but of all the projects I've backed on Kickstarter not a single one has shipped on time.  The original Nomiku was supposed to be delivered in December 2012, actual delivery happened quite a bit later than that but they did deliver so I wasn't too worried.  I'm happy to report that my WiFi Nomiku was finally delivered today!


When I opened the box I was surprised to find the circulator packed with a shirt, I had completely forgotten about that!  The box itself takes up much less space than the original model which should make it easier to store when not in use.

Here is the WiFi Nomiku attached to a 12 quart Cambro filled with 10 liters of water.  Unlike the original Nomiku (and the Anova Precision Cooker), the screen faces away from the bath.  This is something that several people had suggested when giving feedback about the original model and something I was pleased to see implemented.  The new model also doesn't have the external power brick that the original model had, I never minded it that much but others thought that it could be easy to inadvertently splash water on it damaging the circulator.  Local controls are pretty simple, there is a menu button below the screen to the left with a action button immediately the right.  Without reading the manual I was able to figure out how to connect to WiFi, entering the router password is a little clumsy since you have to scroll though all the lowercase letters to get to uppercase and scroll all the way through those to get to numbers/symbols.  It can take a while if your router password is strong with a mix of upper/lower case and symbols/numbers.  It would be nice if this could be done automatically like the Google Chromecast works.  Once the circulator was connected to WiFi I was having problems pairing it to my phone, I eventually had to uninstall the Tender app and reinstall.  After that it seemed to work fine.  Tomorrow when I'm out I'll see if I can turn the circulator on from standby and heat up the bath, the ability to have the bath already heated up when I get home from work will save me a lot of time!

The only testing I had the time to do today was to see how fast the WiFi Nomiku can heat up the water bath.  I filled the Cambro with 10 liters of cold tap water (I know, I usually fill it with hot but this was a test!), the initial temp was 52.4°f and I set the circulator to heat it to 130°f.  Yesterday I did the exact same thing with my Anova Percision Cooker, it took 50 minutes to go from the same starting temp of 52.4° to 130°, the WiFi Nomiku did the same thing in 27 minutes and 36 seconds!  Both baths were uncovered, I expect the time to go down a little once I cut the Cambro lid to fit the new circulator.

So far I'm really liking this new circulator, even without the WiFi connectivity it's a solidly build piece of equipment and I foresee it becoming my go-to circulator.  That being said, I think the clip could stand to be improved.  I've been thinking of a way to make a bracket that I could use to attach the circulator to the side of a beer cooler without having to make permanent modifications.  If I come up with something I'll put DIY instructions on the blog.


Monday, December 28, 2015

Again with the dead blog!

It's been a long time since I've posted, just been busy with other things I suppose.  I spent a lot of weekends playing with the Bradley Smoker and the PID temperature controller.  There were some intermittent issues with the controller just losing power randomly, not a good thing to go out to check on things and find the smoker off and cool.  I assumed it was just a flakey electrical connection but the issue kept coming back even after rewiring everything, after rebuilding the thing several times I was able to finally determine that the issue was the fused main switch I had used.  Since bypassing the switch/fuse it has worked flawlessly.

Both of the food-related items I had backed on crowd funding sites that I was hoping to have delivered before Christmas have had their shipping dates backed up.  The new WiFi Nomiku (Kickstarter) has just started mass production so hopefully I'll be able to post a review of that soon.  The Paragon Induction Cooker (Indigogo) has had the expected ship window backed up to sometime in February, once that little piece of tech arrives I'm going to try and get back in to homebrewing!

For Christmas I like to make a standing rib roast, and this year was no exception.  We picked up a nice loin-end rib roast at Mariano's, since opening up a store near us a few months ago it has become my go-to grocery store.  Not as cheap as Jewel but they seem to be a little higher quality, now that they've been bought by Cincinnati based Kroger's we'll see if that continues to be the case .  I had the butcher cut off the bones and tie them back on, then on Christmas morning I seasoned the roast liberally and browned in some rendered beef tallow in a carbon steel pan.  The carbon steel skillet is something I wanted to get after reading an article in Cooks Illustrated about them, unfortunately by the time I saw the article it had been out a few days and the pan they chose as their best buy was sold out everywhere, the only ones I could find were selling for over 10 times MSRP (around $400 for a $40 list pan).  I picked up the skillet shown at Cost Plus World Market for under $20, but it isn't showing up on their website anymore.  Here it is on Amazon for a little more.  After searing all sides of the roast and letting it cool down a bit I placed it in a big zip-lock bag along with a few closes of garlic, herbs and more beef tallow then evacuated as much air as possible and placed it in a 130°f water bath for about 5 hours.  At that point the roast was removed from the bath and allowed to cool for 30 minutes before being finished in a hot (400°f) oven to produce a nice crust.

I had heard about these amazing popovers they serve at BLT Steakhouse in New York City and wanted to try them out.  They make the recipe available on their website so I decided to give it a try.  I'm not a big fan of volumetric measurements for things like flour so I tried to weigh everything out so I could reproduce the results if they worked out, they did so here are my weights for a 1/2 batch (6 popovers).

4 eggs (200 grams)
2 cups whole milk (scalded)
2 cups bread flour (240 grams)
Salt (5 grams)
Gruyere cheese (170 grams, grated)

Preheat the oven to 350°f.  Put the popover pan in the oven to heat up, I put some beef tallow in each cup to melt.  Mix together the flour and salt.  Scald the milk.  Whisk the eggs until frothy (I did this in a stand mixer fitted with a whisk).  Slowly pour the hot milk in to the eggs while whisking to prevent scrambling the eggs.  Fold the dry ingredients in to the egg mixture just until you get a smooth batter.  Remove the popover pan from the oven and spray with vegetable spray.  Fill each cup about 3/4 of the way full with batter.  Top each with 1-2 Tb grated gruyere cheese.  Bake at 350°f for ~50 minutes, turning the pan 1/2 way through baking.  These turned out fantastic and I think they'll be a new Christmas tradition.

The meal was rounded out with potatoes dauphinoise (I used some that I had vacuum sealed in the freezer from last year, don't tell anyone!), asparagus, a mushroom/pearl onion beef gravy, dinner rolls (in case the popovers didn't work out) and a chocolate cream pie for dessert (that deserves it's own post so I'll do that next week).

Food related gifts included a book (The American Plate:  A Culinary History in 100 Bites) and a Modernist Cuisine Spherification Kit.  I've played around with spherification before but now that I have a decent kit I'll have to revisit the technique.

Saturday, September 5, 2015

Homemade digital temperature controller for New Original Bradley Smoker

I've been having fun using my Bradley smoker but the control on the model requires a lot of fiddling with to achieve and maintain the desired temperature.  To make things easier I decided to add a digital temperature controller to my setup, but to make things harder I decided to make one myself instead of purchasing a pre-made unit.  Pictured to the right is what I came up with.  It consists of a Mypin TD4 PID controller with 25A SSR and heatsink, a K-type thermocouple probe, a IEC320 C14 main power switch with 10 amp fuse all housed in a styrene plastic project box .

Power is output through a standard 15 amp duplex outlet.  These come standard with both plug sockets connected so you only need to wire up one set of terminal connectors to power both outlets.  For this application I wanted one outlet to be regular uninterrupted AC power while the other would be run through the solid state relay (SSR) to control the heating element.  To make each outlet independent you just need to use a set of clipper to cut out the copper tab that connects the two terminals on both sides.


Once I had all the parts it was time to get started.  The first obstacle was to cut openings in the styrene project box for the PID controller, power connector/switch and outlets.  My first attempt didn't work out too well, I tried to use a rotary tool with a cut-off disk attached to cut out an opening.  This resulted in big globs of very hot plastic landing on my hand and the cut-off wheel shattering.  I then used a zip saw attachment for the rotary tool, but wasn't really able to control it very well and ended up with a hole that was too large for any of the components (if anyone asks I'll claim that the odd hole on the bottom is there for ventilation).  What finally ended up working for me is using the cut-off wheel to cut a slit on each side of the cutout and then using a jab saw with a metal cutting blade to finish the cuts to make the openings.  The outlets and PID controller were mounted right on the open edge of the box to save a few cuts. Holes were drilled for the mounting screws for the SSR heat sink, switch and outlets and a hole was drilled towards the top large enough to thread the thermocouple leads through. Now came the wiring.  Three wires come from the power switch, black (hot), white (neutral) and green (ground).  The ground wire was connected to the green terminal on the outlet.  Wire nuts were used to connect three leads to both the black and white wires coming from the switch.  One set (black and white) was connected to the PID controller to power the instrument.  The other two neutral (white) wires were connected to the silver terminals on the outlet.  One of the two remaining hot (black) leads was connected directly to the top gold terminal of the outlet, the final black lead was connected to the bottom gold terminal after passing through the SSR.  Finally, the control signal wires (in this case I used thinner black and white wires because that's what I had) from the PID control were connected to the DC side of the SSR.  The polarity of these connections matters so you need to be sure to connect (-) to (-) and (+) to (+).  The thermocouple was threaded through the drilled hole connected to the PID controller (again, polarity matters) and everything was mounted to the styrene case with nuts and bolts.  Finally, the top of the case was screwed in to place.

This project took a lot longer to complete since it was the first time I had attempted something of this nature.  I have not been able to try out the control box on the smoker, but I did plug a lamp in to the SSR outlet and verified that it does what it's supposed to do, when the thermocouple probe was immersed in hot water the PID started turning the lamp on and off and finally keeping it off once the measured temperature exceeded the set-point.

I spent a lot of time trying to plan out this project to end up with something that would not only work for the original purpose, but also be able to be used for other things.  Besides being used on the smoker I could see using it for home brewing to control the temperature of the mash.  I could also switch the PID controller to cooling mode, plug in a small refrigerator and use it for lagering beer.  Plug a submersible heater in the bottom outlet and a circulating pump in the top outlet and you'd have a decent sous vide setup.  The other benefit of building a stand-alone controller is that I didn't need to make any modifications at all to the smoker itself, which will be handy if I ever decide to sell it for an upgrade.

Tuesday, July 28, 2015

It's here!: Bradley Original Smoker Edition.

For years I've had a charcoal "bullet" smoker, and while it can produce some great meals it has a lot of drawbacks.  The main thing is that it's difficult to maintain temperature, doing so requires constant attention and fiddling which can be a challenge for long cooks.  As a result, after an initial flurry of smoking things I really haven't used it much over the past several years.  Lately I've been seeing a lot of barbecue programs on TV and have become re-interested so I started looking for a new smoker that would be easier to use and require less attention.  I looked at several types of smokers, fueled by charcoal, propane and electric.  In the end, a warehouse deal from Amazon sealed the deal and I ordered a Bradley (new) Original Smoker.  The Bradley is an electric smoker that uses sawdust pucks called "bisquettes" for the smoke.  The bisquettes are loaded in to a hopper and are fed one-by-one on to a heating element in the smoker chamber to produce smoke at a rate of one every 20 minutes.

Here is a video of the unboxing.

One thing that I didn't know until the day after ordering was that the smoker itself does not come with any of the required bisquettes, so I ordered a variety pack which was set to be delivered the day after the smoker itself.  I had intended on smoking a whole chicken, had it prepped, rubbed and ready to go.  Unfortunately the bisquettes didn't come until late in the evening so I had to go ahead and just roast the chicken in the oven rather than let it sit overnight with the rub.  Still wanting to make sue of the smoker I went out the next morning and picked up some baby back ribs.

Preparation was simple, I pulled the membrane off the bottom of the rack of ribs and liberally applied a rub (salt, pepper, sugar, paprika, cayenne pepper, celery salt, lemon pepper) then allowed it to sit for a few hours in the refrigerator.  While the ribs rested I set up the smoker, turned it on and put in 5 bisquettes for the seasoning process.    That involved about an hour of smoke at temperature to drive off any manufacturing residues and get the smoker ready for business.

The night before I had run all the removable pans, grates and bowls through the dishwasher.  Assembly of the smoker is pretty easy, the drip pan goes on the bottom and a water filled metal bowl is put in place.  The water-filled bowl is there to catch the still smoldering bisquettes as they are pushed off the heating element by the next one, this keeps ashes from flying up on tot he food.  Above that is a heat deflector followed by up to four metal racks.  The smoke generator slides in the side and attaches to a couple of metal pins, there is a power cord running to the smoke generator box and another running from that box to the smoking chamber for the main heating element.  Controls are simple, just a power switch and a dial that allows you to set the temperature from low to high.  There is also a button to advance the bisquettes.  Once you get the smoker loaded and closed you'll have to baby the temperature a bit by adjusting the dial and top vent, but once you get it where you want it seems to be pretty stable.  I put the ribs in and adjusted the temperature to about 225 degrees f.  For smoke I used a mix of apple and mesquite bisquettes for the first few hours, then again for the last 20 minutes or so.  All told the ribs were in the smoker for about 6 hours.

The ribs turned out pretty darn good, and since the smoker was running anyway I put the chicken I had roasted the night before in as well for a little smoke flavor.  All in all I'm pretty happy with the Bradley smoker.  I feel that I'll be able to do things with it that weren't possible with the old bullet smoker, like leaving it running unattended while I'm away at work or asleep for long cooks.  In order to improve the temperature stability I'm looking at wiring up a PID controller with a thermocouple and solid state relay to let me dial in a desired temperature and not have to worry about overshooting it when I'm not around.  Those parts should be here tomorrow.  I'm thinking of picking up a bone-in pork shoulder roast for this weekend to make some barbecue pulled pork.  Other things I want to try out before the end of summer is short ribs and eventually brisket.  That was something I was afraid to even try with the bullet smoker, but now may be a possibility!

Monday, July 6, 2015

July 4th Menu

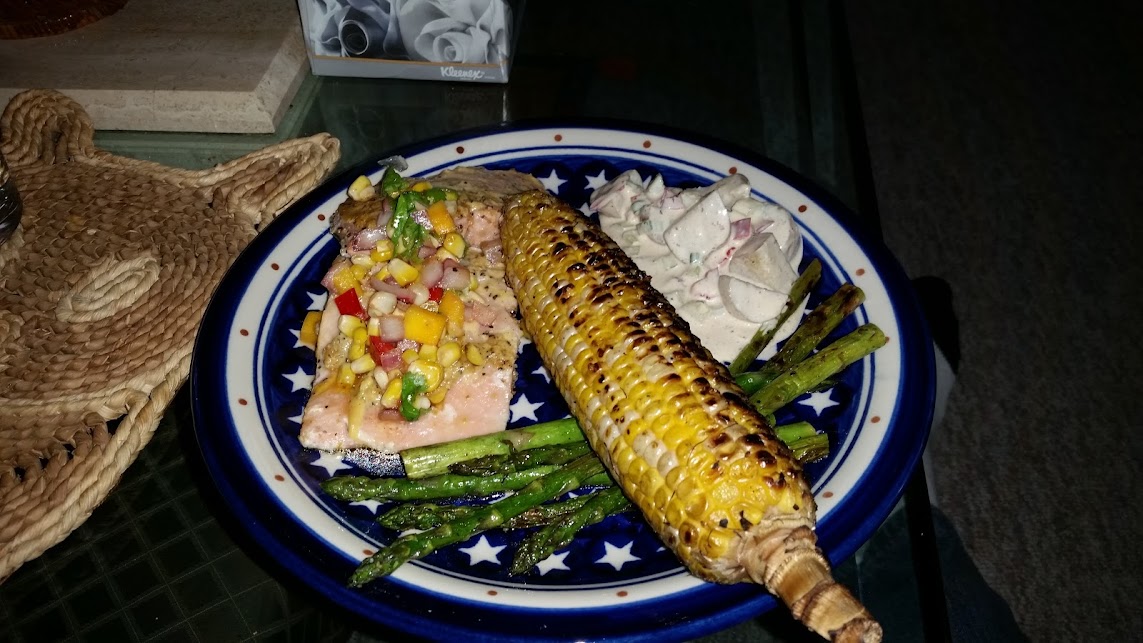
For the 4th this year the menu included cedar plank salmon with grilled corn/mango salsa, sous vide potato salad, grilled asparagus and grilled corn.

The only salmon I had access to was pre-portioned, frozen the individually vacuum packed.  I placed the packets in a 125f water bath for about 45 minutes to thaw and get up to temperature, next time I'll probably go a little lower (like 115f-120f).  The salmon was then put in the refrigerator until time to grill.  I placed the salmon fillets skin side down on a soaked cedar plank, spread some honey Dijon mustard on the top, sprinkled with lemon pepper and topped with a slice of fresh lemon.  The grill was set up with a standard two level fire, the plank was put over the hot side until it started to smolder, then moved to the cool side.  Since the salmon was already cooked I just needed to let it heat through and absorb some of the grill flavor.  Once done I topped with a grilled corn/mango salsa consisting of some previously grilled corn, diced mango, diced red onion, diced hot red pepper, cilantro, lime juice, salt, pepper and olive oil.

The potatoes for the potato salad were cut in to pieces, tossed with salt, pepper and champagne vinegar and vacuum bagged with a knob of butter.  They were cooked in a 185f bath for about 3 hours, I kind of got distracted and forgot about them for a bit so they were in the bath longer than intended but doneness turned out great.  They were chilled overnight and mixed with the dressing and other ingredients a few hours before serving.  The dressing consisted of mayonnaise, balsamic vinegar, champagne vinegar, celery salt, black pepper, chili/garlic paste, diced celery, thinly sliced radish and thinly sliced green onion (white and green parts) along with red pepper left over from the salsa.  I dumped the potatoes in the bowl where I had mixed the dressing and folded them in, next time I'll dirty another bowl so I can put in just enough dressing to coat the potatoes, these were a little over dressed.

The other sides were grilled asparagus (tossed in olive oil, salt, pepper before being grilled) and grilled corn (just soaked for a few hours before going on the heat to get a char).  Both turned out great.

Dessert was an apple pie from the Hoosier Momma Book Book of Pie cookbook, I picked it up a Costco last year when the author was signing copies.  Turned out great!  It was served with a vanilla/caramel gelato.


Tuesday, May 26, 2015

Memorial Day: Peach stuffed banana bread

For Memorial Day I was planning on making a peach cobbler for dessert, I had a can of peaches in the pantry and all the necessary ingredients so it seemed like a no brainer.  The day before the holiday I noticed that we had some bananas that were getting really brown and that would need to be used soon.  Lately I've been making banana bread from my late Mamaw's recipe so that would be a good way to use the bananas.  But did I want to have two sweet things needing to be eaten at the same time?  The solution was to combine them and make a peach stuffed banana bread.

The banana bread recipe is pretty simple, but you need to do things in a particular order for it to come out right.  The ingredients are:

3-4 very ripe bananas
1 ts baking soda
3/4 ts baking powder
1 cup sugar
2 eggs
1 ts vanilla
2 cups AP flour (divided, I use the scoop and level method for measuring)
1 stick butter, melted

First the oven is preheated to 350 and a large loaf pan is prepared by cutting out a piece of parchment paper to fit the bottom.  The pan is sprayed with release spray, the parchment put in the bottom and sprayed again.

Now that that's done it's time to make the batter.  The bananas are peeled and put in the bowl of a stand mixer, the baking soda is added and the mixer turned on, mixing the bananas with the baking soda seems to help them break down.  With the mixer still on the baking powder is added, followed by the sugar, eggs and vanilla.  The speed is turned down to low and 1 cup of flour is added, then the melted butter and finally the final cup of flour.  Only mix until the batter is smooth and you don't see and lumps of flour.  Quickly pour the batter in to the prepared pan.  For plain banana bread you can just bake for 60 minutes, then let cool in the pan for around 10 minutes before turning out and letting cool on a rack.

This time I decided to stuff the banana bread with peaches.  I poured a can of peach pieces in light syrup in to a colander and reserved the liquid.  The peach pieces were pushed in to the batter, trying to keep them from touching the sides of the loaf pan.  Once all the peaches were in place the banana bread was put in the preheated oven to bake, since I had never done this before I added 10 minutes to the normal bake time for a total of 70 minutes.

Here is the result.  The extra baking time was definitely needed to allow the batter around the peaches to cook.  After the oven was turned off I left the loaf pan in there for 10 minutes with the door open to help drive off a little more moisture, then allowed the bread to cool in the pan for 10 minutes before being removed.  It was a little more difficult to turn this out of the pan since I didn't want to mess up the peaches on top but with a little extra care it came out just fine.  I didn't know if the flavors of bananas and peaches would mesh, but they're actually pretty good together!  The peach stuffed banana bread was served with a whipped cream made with heavy cream, powdered sugar and some of the reserved syrup from the can of peaches and some vanilla frozen custard.

Memorial Day: Crock fermented sauerkraut

Last time I made naturally fermented sauerkraut I used a clean jar as the fermentation vessel, this time I decided to use my fermenting crock.  The recipe has only three ingredients...shredded cabbage, salt and caraway seeds.  The crock is 5 liters, and since you want to limit the size of the head space I bought the biggest cabbage I could find.  The cabbage was prepped by cutting in to quarters and removing the core.  The cabbage was shredded and placed in a bowl to be weighed.  The amount of salt to use for sauerkraut varies, 2.25% to 2.5% seems to be the what is recommended.  I had just over 1900 grams of cabbage so I weighed out 44 grams of pickling salt and mixed it in to the cabbage along with 2 Tb caraway seeds.  Over the next 15 minutes I would roughly mix the cabbage every 5 minutes or so while the salt started to pull the liquid from the cabbage, then everything including the extruded liquid and cabbage core was put in the crock and weighed down with the weight stones and short, wide cup filled with water.  The lid was put on the crock and over the next several hours I pushed down on the stones until enough liquid had been pulled from the cabbage to submerge everything, then the water channel was filled to keep out oxygen and the cabbage was left to ferment for 8 days undisturbed.  On day 8 pulled out a sample and liked how it tasted, the cabbage was still crunchy but it had a great sour flavor.  I moved the sauerkraut to a plastic container and put it in the refrigerator to stop the fermentation.  For Memorial Day the sauerkraut was served with grilled sausages and warm purple potato salad.  Crock fermented sauerkraut not only tastes great, but it provides a lot of health benefits.  That's good, because I have a LOT of it left!