I started having problems with my WiFi Nomiku giving me erroneous low water alarms again. This is the second or third unit I've had the same problem with. I'm not sure why this keeps happening, maybe it's something with the water in my area or something I'm doing. This last time it started happening after I added some vinegar to the bath to take out some scale that was building up (we have pretty hard water), the manual suggests using citric acid for that. It's possible that the acetic acid in the vinegar is somehow damaging the water level sensor in the circulator, I'll try a few things to see if I can get everything working again before contacting customer service for another replacement.
Since I'm currently down a circulator I decided to finally try one I've been interested in for a while, but couldn't justify buying...the ChefSteps Joule. Shipping was amazingly fast, I placed the order for the circulator directly from ChefSteps.com on Sunday and it arrived at my door (all the way from China) on Wednesday.
The Joule is different from my other circulators in that it has no manual controls on the unit itself, with the exception of a single button on top. The circulator is controlled using an app installed on an Android or iOS. My understanding is that it can use either Bluetooth or WiFi depending on the situation. Pairing was pretty straightforward, after setting up the Joule in a bath and plugging it in I just opened up the app and saw a little button that said connect to Joule. After pushing the button my phone connected to the Joule via Bluetooth and then a screen popped up asking me to select my WiFi network and ask for my password. A few moments later and we were ready to go. I pushed the power button at the lower right hand corner of the screen, selected the temperature and the Joule came to life! At that time I had to leave, so I opened the app and turned off the circulator. Just as we were about to return home I fired up the app again to see how controlling the circulator from afar via WiFi worked, I touched the power button and selected a different temperature than I had entered earlier to start up the Joule. On the way home I received a push notification telling me that the bath had reached temperature and was ready to cook. When we did arrive at the house I pulled out my Thermapen to check the bath temperature and it was spot on at 140°f. I'll do some more playing around with the Joule tonight after work. One thing the Joule can apparently do, but that I can't test out, is be controlled by voice commands using an Amazon Echo. I may have to look at the Echo to see if there are enough other reasons to fork out the cash for one, for now I'll just have to stick to using the app.
Some initial thoughts...
Pros:
Very compact size for easy storage
Powerful heating element (1100 watts)
Water resistant (due to lack of manual controls)
WiFi and Bluetooth connectivity
Magnetic base to stick to the bottom of induction ready pots
Voice control option (with additional gadget)
Cons:
Lack of manual controls means you have to have an Apple or Android smart device to use.
That's pretty much all I can think of at the moment. I'll have to see if requiring a separate device to use the circulator is a hassle, I have two other "connected" circulators (WiFi Nomiku and Anova BT Precision Cooker) that can be controlled via apps but I almost never use that feature, preferring to set the temperature using the manual controls on the units. Having to use the app may take a little getting used to.
Showing posts with label anova. Show all posts
Thursday, April 27, 2017
Monday, July 6, 2015
July 4th Menu
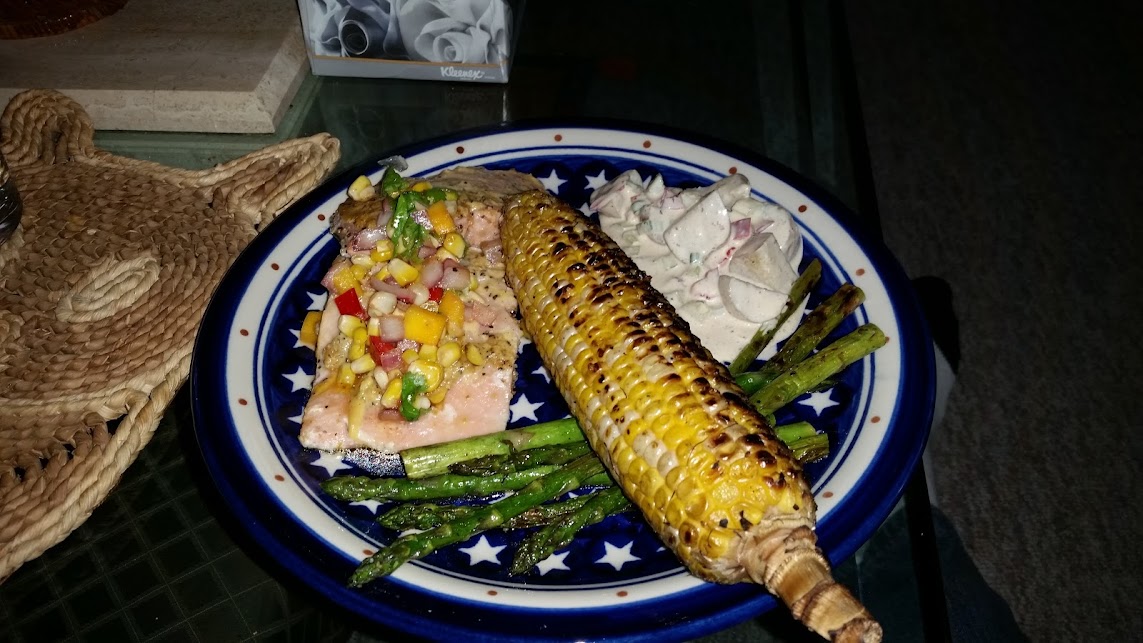
For the 4th this year the menu included cedar plank salmon with grilled corn/mango salsa, sous vide potato salad, grilled asparagus and grilled corn.
The only salmon I had access to was pre-portioned, frozen the individually vacuum packed. I placed the packets in a 125f water bath for about 45 minutes to thaw and get up to temperature, next time I'll probably go a little lower (like 115f-120f). The salmon was then put in the refrigerator until time to grill. I placed the salmon fillets skin side down on a soaked cedar plank, spread some honey Dijon mustard on the top, sprinkled with lemon pepper and topped with a slice of fresh lemon. The grill was set up with a standard two level fire, the plank was put over the hot side until it started to smolder, then moved to the cool side. Since the salmon was already cooked I just needed to let it heat through and absorb some of the grill flavor. Once done I topped with a grilled corn/mango salsa consisting of some previously grilled corn, diced mango, diced red onion, diced hot red pepper, cilantro, lime juice, salt, pepper and olive oil.
The potatoes for the potato salad were cut in to pieces, tossed with salt, pepper and champagne vinegar and vacuum bagged with a knob of butter. They were cooked in a 185f bath for about 3 hours, I kind of got distracted and forgot about them for a bit so they were in the bath longer than intended but doneness turned out great. They were chilled overnight and mixed with the dressing and other ingredients a few hours before serving. The dressing consisted of mayonnaise, balsamic vinegar, champagne vinegar, celery salt, black pepper, chili/garlic paste, diced celery, thinly sliced radish and thinly sliced green onion (white and green parts) along with red pepper left over from the salsa. I dumped the potatoes in the bowl where I had mixed the dressing and folded them in, next time I'll dirty another bowl so I can put in just enough dressing to coat the potatoes, these were a little over dressed.
The other sides were grilled asparagus (tossed in olive oil, salt, pepper before being grilled) and grilled corn (just soaked for a few hours before going on the heat to get a char). Both turned out great.
Dessert was an apple pie from the Hoosier Momma Book Book of Pie cookbook, I picked it up a Costco last year when the author was signing copies. Turned out great! It was served with a vanilla/caramel gelato.
The only salmon I had access to was pre-portioned, frozen the individually vacuum packed. I placed the packets in a 125f water bath for about 45 minutes to thaw and get up to temperature, next time I'll probably go a little lower (like 115f-120f). The salmon was then put in the refrigerator until time to grill. I placed the salmon fillets skin side down on a soaked cedar plank, spread some honey Dijon mustard on the top, sprinkled with lemon pepper and topped with a slice of fresh lemon. The grill was set up with a standard two level fire, the plank was put over the hot side until it started to smolder, then moved to the cool side. Since the salmon was already cooked I just needed to let it heat through and absorb some of the grill flavor. Once done I topped with a grilled corn/mango salsa consisting of some previously grilled corn, diced mango, diced red onion, diced hot red pepper, cilantro, lime juice, salt, pepper and olive oil.
The potatoes for the potato salad were cut in to pieces, tossed with salt, pepper and champagne vinegar and vacuum bagged with a knob of butter. They were cooked in a 185f bath for about 3 hours, I kind of got distracted and forgot about them for a bit so they were in the bath longer than intended but doneness turned out great. They were chilled overnight and mixed with the dressing and other ingredients a few hours before serving. The dressing consisted of mayonnaise, balsamic vinegar, champagne vinegar, celery salt, black pepper, chili/garlic paste, diced celery, thinly sliced radish and thinly sliced green onion (white and green parts) along with red pepper left over from the salsa. I dumped the potatoes in the bowl where I had mixed the dressing and folded them in, next time I'll dirty another bowl so I can put in just enough dressing to coat the potatoes, these were a little over dressed.
The other sides were grilled asparagus (tossed in olive oil, salt, pepper before being grilled) and grilled corn (just soaked for a few hours before going on the heat to get a char). Both turned out great.
Dessert was an apple pie from the Hoosier Momma Book Book of Pie cookbook, I picked it up a Costco last year when the author was signing copies. Turned out great! It was served with a vanilla/caramel gelato.
Tuesday, May 26, 2015
Memorial Day: Purple Potato Salad Sous Vide
The side dish I decided to make this Memorial Day was a warm potato salad, but I didn't want to go for a standard German potato salad. For the potatoes I picked up a bag of small purple potatoes at the supermarket, no reason, they were just on sale.
I usually have a water bath set up in the kitchen, but sice this was going to be a pretty hot bath I put a couple of sisal fiber placemats under the Cambro to protect the granite countertop. I set the circulator to 90C and turned it on.
The potatoes were cut in to bite sized pieces and tossed with olive oil, salt, pepper and granulated onion. I smashed four garlic cloves and threw them in as well. Everything was put in to a Foodsaver bag along with 2 tbs butter and vacuum sealed, then the pouch was placed in the still heating bath. In order to allow the bath to heat up as quickly as possible a blanket was wrapped around the bath and dish towels laid over the top. Once the bath hit 90C a timer was set for 30 minutes. When the timer went off the pouch was retreived from the bath, cut open, and the potatoes were dumped in a colander placed over a bowl. A vinaigrette was made by whisking the liquid drained from the potatoes with 2-3 Tb honey dijon mustard, about 1/4 cup olive oil and around 2 Tb white wine vinegar until an emulsion was formed, which was then tossed with the still hot potatoes. Thinly sliced onion, diced Anaheim pepper, capers, chives and a little cilantro were folded in and the potato salad was covered and allowed to sit for 30 minutes for the flavors to marry.
This potato salad turned out really well, the potatoes were tender but not to the point of falling apart and because they were mixed with the vinegraitte when they were still hot they absorbed a lot of flavor. By cooking the potatoes sous vide and incorporating the bag liquid in the vinegraitte all the potato flavor stayed where it belonged. I'll be adding this recipe to the summer holiday rotation.
I usually have a water bath set up in the kitchen, but sice this was going to be a pretty hot bath I put a couple of sisal fiber placemats under the Cambro to protect the granite countertop. I set the circulator to 90C and turned it on.
The potatoes were cut in to bite sized pieces and tossed with olive oil, salt, pepper and granulated onion. I smashed four garlic cloves and threw them in as well. Everything was put in to a Foodsaver bag along with 2 tbs butter and vacuum sealed, then the pouch was placed in the still heating bath. In order to allow the bath to heat up as quickly as possible a blanket was wrapped around the bath and dish towels laid over the top. Once the bath hit 90C a timer was set for 30 minutes. When the timer went off the pouch was retreived from the bath, cut open, and the potatoes were dumped in a colander placed over a bowl. A vinaigrette was made by whisking the liquid drained from the potatoes with 2-3 Tb honey dijon mustard, about 1/4 cup olive oil and around 2 Tb white wine vinegar until an emulsion was formed, which was then tossed with the still hot potatoes. Thinly sliced onion, diced Anaheim pepper, capers, chives and a little cilantro were folded in and the potato salad was covered and allowed to sit for 30 minutes for the flavors to marry.This potato salad turned out really well, the potatoes were tender but not to the point of falling apart and because they were mixed with the vinegraitte when they were still hot they absorbed a lot of flavor. By cooking the potatoes sous vide and incorporating the bag liquid in the vinegraitte all the potato flavor stayed where it belonged. I'll be adding this recipe to the summer holiday rotation.
Labels:
anova,
potato salad,
potatoe,
precision cooker,
purple potato,
sous vide,
vinegrette
Monday, December 29, 2014
Faux-aged, Searzall seared, sous vide cooked standing rib roast (with mushroom/black garlic gravy).
We have traditions. For Fourth of July we have a cook out, Thanksgiving is a traditional turkey dinner with all the trimmings and Christmas we have a standing rib roast with dauphinoise potatoes, fresh yeast rolls and a few rotating vegetables. This Christmas was no different, but earlier in the year I had read about a technique for taking wet-aged beef from the supermarket and imparting the flavors of a dry aged cut of meat and I wanted to try it out.
I believe this process was originally described in one of the Modernist Cuisine books (at home?) but I first read about it on the Seriouseats blog. The process takes some time, so 8 days before Christmas I went to our local supermarket (Jewel-Osco) and picked up a 2 bone rib roast. After looking at what was available I picked one that was a good mix of lean muscle to fat, I would describe it as solidly in the choice grade. Once at home I started the process.
The first step in the faux-aging process is to coat the cut of beef with fish sauce, vacuum seal and let it sit in the refrigerator for 3-4 days. I grabbed a bottle of Tiparo's Fish Sauce from the pantry and tried to coat every surface of the roast, then let it sit in the run-off for a few minuted while I cut and prepared a suitably large Foodsaver bag. The roast was just small enough to fit in the bag, which was then vacuum sealed and left in the refrigerator for four days.
The next step is to remove the roast from the bag and let it sit in the refrigerator loosely covered for a few days to allow moisture to evaporate from the meat. The way I saw it described (which was for steaks instead of roasts) was to wrap the meat in a few layers of cheesecloth, but since I didn't have any of that laying around I just draped a couple of sheets of parchment paper of the roast and covered the whole thing with a dish towel. Before covering I had coated the exposed meat with cracked black pepper. This was left in the refrigerator for 3 more days.
This was the roast after three days dehydrating in the refrigerator, as you can see the fat cap had turned a bit yellowish/brown and there were some dark areas on the exposed muscle. The next step was to trim the roast of most of the fat cap and any discolored meat. Before starting, I set my new Anova Precision Cooker up on a 12 quart Cambro, filled it to a few inched above the minimum and started heating the bath to 132f.
I then went about trimming the roast, all the scraps were saved so I could render them down later and use the fat for other parts of the meal. Once trimmed the roast was seasoned with salt and pepper, and I broke out the Searzall to sear all the surfaces. There are several schools of thoughts when it comes to searing sous vide cooked meats. I like to sear before AND after the soak. The initial sear not only serves to kill off any surface bacteria that might be present, but the Maillard reactions that occur during the sear will have a chance to permeate the meat during the soak. The second searing lets you develop a good crust on the meat. The seared roast was again vacuum sealed using the Foodsaver and the bag placed in the water bath. I added water to bring the bath up to near the max level and left it to soak for about 5 hours.
Here is the bagged roast soaking in the water bath. Initially the temperature went down about 10 degrees when the roast was added and the water level topped off, but the circulator rebounded quickly and the bath temperature was back up where I wanted it within 10 minutes.

I believe this process was originally described in one of the Modernist Cuisine books (at home?) but I first read about it on the Seriouseats blog. The process takes some time, so 8 days before Christmas I went to our local supermarket (Jewel-Osco) and picked up a 2 bone rib roast. After looking at what was available I picked one that was a good mix of lean muscle to fat, I would describe it as solidly in the choice grade. Once at home I started the process.
The first step in the faux-aging process is to coat the cut of beef with fish sauce, vacuum seal and let it sit in the refrigerator for 3-4 days. I grabbed a bottle of Tiparo's Fish Sauce from the pantry and tried to coat every surface of the roast, then let it sit in the run-off for a few minuted while I cut and prepared a suitably large Foodsaver bag. The roast was just small enough to fit in the bag, which was then vacuum sealed and left in the refrigerator for four days.
The next step is to remove the roast from the bag and let it sit in the refrigerator loosely covered for a few days to allow moisture to evaporate from the meat. The way I saw it described (which was for steaks instead of roasts) was to wrap the meat in a few layers of cheesecloth, but since I didn't have any of that laying around I just draped a couple of sheets of parchment paper of the roast and covered the whole thing with a dish towel. Before covering I had coated the exposed meat with cracked black pepper. This was left in the refrigerator for 3 more days.
This was the roast after three days dehydrating in the refrigerator, as you can see the fat cap had turned a bit yellowish/brown and there were some dark areas on the exposed muscle. The next step was to trim the roast of most of the fat cap and any discolored meat. Before starting, I set my new Anova Precision Cooker up on a 12 quart Cambro, filled it to a few inched above the minimum and started heating the bath to 132f.
I then went about trimming the roast, all the scraps were saved so I could render them down later and use the fat for other parts of the meal. Once trimmed the roast was seasoned with salt and pepper, and I broke out the Searzall to sear all the surfaces. There are several schools of thoughts when it comes to searing sous vide cooked meats. I like to sear before AND after the soak. The initial sear not only serves to kill off any surface bacteria that might be present, but the Maillard reactions that occur during the sear will have a chance to permeate the meat during the soak. The second searing lets you develop a good crust on the meat. The seared roast was again vacuum sealed using the Foodsaver and the bag placed in the water bath. I added water to bring the bath up to near the max level and left it to soak for about 5 hours.

After 5 hours it was time to remove the roast from the bath. This was the day before Christmas, so the roast was chilled in an ice bath and set in the refrigerator until the next day. For serving I simply rethermed the roast in a 130f bath for about an hour, then removed from the bag, patted dry and allowed to rest for about 10 minutes before placing in a very hot oven (500f) for about 10 minutes to dry off the outer surface and develop a nice crust.
To serve with the roast I made a quick mushroom/black garlic gravy. I've been playing around with black garlic a bit lately and wanted to find a way to incorporate it in the the meal. Shallots and mushrooms were browned in some of the fat rendered from the beef trimmings, once suitably colored a bit of flour was added to form a roux. The roux was cooked for a few minutes to get rid of the raw flour taste, minced black garlic was added and the pan was deglazed with some red wine. Beef broth was added and the gravy was left to reduce and thicken on the stove top.
So was it worth it? The resulting roast had some of the flavors you expect to find in dry-aged beef, but at a fraction of the cost. Real dry aged beef will have more concentrated and complex flavors, but if you don't want to pay 5 times as much this technique will give you a good result somewhere between a wet aged roast and its much more expensive dry aged cousin.
Labels:
anova,
Beef,
food saver,
foodsaver,
precision cooker,
prime rib,
searzall,
sous vide,
standing rib roast
Thursday, November 20, 2014
It's Here!: Anova Precision Cooker Edition
I've heard good things about the Anova immersion circulator so when I heard that they had started a Kickstarted campaign for a second generation of their circulator I jumped on board. Since I got in so early, I was able to get one at the "Founder's Club" level for $99 and yesterday it finally arrived!
And here it is! The packaging is very good looking, a cylinger about 5" in diameter and 25" long with a yellow cap and black body emblazoned with their logo. Once you twist off the cap you'll find the circulator nestled in the package with some foam rings and caps. Everything about the packaging seems to be well thought out and should provide a great deal of protection for the circulator when I'm taking it on the road with me.
Here is everything removed from the packaging. The circulator is quite a bit larger than my Nomiku but looks good and has a really nice, bright, large display. There is no manual included in the box so I highly suggest downloading it from the Anova Culinary website. The controls are somewhat intuitive but there are a few things that may not be so obvious, such as how to switch from farenheit to celcius. The clamp attaches to the cooking vessel and allows you to easily adjust the height of the circulator so you can use smaller pots. There are minimum and maximum water levels marked on the stainless steel sleeve of the circulator, however I did see some issues with the measurement of temperature when running towards the minimum water level mark.
Here is the circulator mounted to a 12 quart Cambro. If you look closely you can see the MAX water level mark, there is also a small indentation in the stainless steel sleeve at this level. In the picture to the left I had filled the Cambro to the 8 quart (7.57 liter) mark with cold tap water, normally I would fill the bath with hot tap water but I wanted to see how quickly the new Anova would heat it up. First I filled the container to the 8 quart mark and attached my Nomiku to see how much it would heat the bath in 15 minutes, then I dumped the container, refilled it with cold tap water to the 8 quart mark and put on the Anova which brough the water level to just a few inches above the MIN mark on the sleeve. This is were I noticed something odd, when started the temperature display on the Anova started going up considerably faster than the Nomiku's had. When I touched the power button to turn off the circulator the temperature reading dropped quickly. A temperature probe confirmed that the reading on the Anova was high during the heating phase, but once the set point was reached the reading was spot on. This only happened when the water level was near the MIN mark on the sleeve, when I filled the Cambro up to the 10 liter mark the temperature display on the circulator and on my probe thermometer stayed in sync. As a final test I fulled up the Cambro with 10 liters of cold tap water (15.5C), attached the Anova Precision Cooker and set it for a 60C bath. On an uncovered polycarbonate container it took 63 minutes to heat the bath up to the set point. This is on par with other circulators I've used and is why we always want to start by filling our baths with hot tap water. My first impressions of the Anova Precision Cooker is that it looks great, is quiet and easy to use. I have not had a chance to play around with the Bluetooth connectivity since the Android app has not been released yet, I may have to dig up my old iPhone just so I can play around with the feature until an app for my phone is released.
Labels:
anova,
immersion circulator,
kickstarter,
precision cooker
Monday, September 8, 2014
Busy summer, hope to start posting more often soon.
Its been a busy summer and again I've neglected this blog for far too long. The next few months should give me lots to write about, I should be receiving three items from Kickstarter campaigns I funded. Within a few week my Searzall should arrive. To get ready for this I went and purchased the recommended torch head to replace the really cheap one I originally bought at the hardware store to make creme brulee. This should come in handy this winter when I won't be able to fire up the grill to sear my sous vide cooked steaks and chicken. Next month (or soon after) I'm expecting my Anova Precision Cooker to be delivered. I love my Nomiku but I've heard good things about Anova so when I had the chance to grab one at the $99 level I jumped at it, never can have too many circulators! A little further down the road (estimated March 2015) will be the next iteration of the Nomiku! This kickstarter is still ongoing for the next few days so if you want a great circulator at a good price go there now!
With the exception of Labor day I haven't really been cooking anything new. I have been experimenting with different times and temperatures for eggs, the yolk of a 63C egg if perfect but the loose white is a turn off for me. So far I've tried 75C for 13 minutes, which is nice but the yolk just isn't the same, and dropping a 63C egg in to simmering water long enough to firm up the white. I think the latter technique will work best but I'm still trying to figure out how long it takes to get the firm white I want without overcooking the yolk.
I was able to play around a bit on Labor day. Both the potato salad and asparagus were cooked sous vide at 85C for 45 minutes. In the past I've soaked asparagus at 90C for 10 minutes, I think the lower temperature and longer time gives a better texture to the finished product. For the potato salad I tossed the potatoes in a mixture of Dijon mustard, dill pickle juice, salt, pepper and some dried dill. This was sealed in a vacuum bag and cooked along with the asparagus. The next day the potatoes were mixed with some diced onion and bell pepper, sliced asparagus and Mexican sour gherkin cucumbers that we had. I added a little mayo to half of the potato salad and left the rest mayo free for those who didn't want the extra fat. Both were excellent, this really is the best way I've found to cook the potatoes so they are complete permeated with flavor.
We were having polish sausages as the main course, so I wanted to make one more thing... really good sausage rolls. I'm a fan of New England split top rolls, the kind that are used for lobster rolls on the east coast, but they're a little hard to find in Chicago. I've grown fond of a recipe in an old King Arthur Flour catalog to which I've made a few changes. I prefer my bread doughs to have a long, cold fermentation in the refrigerator instead of letting them ferment at room temperature, I find the long ferment allows better flavor development, improved texture and makes the dough easier to work with. To do this you just need to decrease the amount of yeast in the formula, I halved the yeast in the original recipe for these rolls. This technique is particularly good for pizza dough, it not only gives you a great yeasty flavor in your crust but the dough is also much easier to stretch out. But the main advantage to this technique, and the reason that most pizzerias use it, is that it significantly increases the window in which the dough is usable. My dough is ready to go after 24 hours, but it will keep in the fridge for up to 5 days and still give me a great crust. The one disadvantage is that you can't just use the dough right out of the fridge, it needs to warm up first before being shaped. In the past I've just left it sitting on the counter for a few hours but this time I still had the Nomiku set up on the water bath from the day before so I thought I try something new. The dough had been cold fermenting overnight in a large zip-lock freezer bag. I set the temperature of the water bath to 35C and forced as much gas out of the bag as possible, closed it and clipped it to the side of the bath. After 7 minutes the bag had started to float due to the gasses being produced by the yeast, I flipped the bag over and let it go for another 7 minutes. Using the Nomiku I was able to bring the dough up to temperature in around 15 minutes, something that usually takes well over an hour! This is going to open up a lot of possibilities for week-night baked goods!
With the exception of Labor day I haven't really been cooking anything new. I have been experimenting with different times and temperatures for eggs, the yolk of a 63C egg if perfect but the loose white is a turn off for me. So far I've tried 75C for 13 minutes, which is nice but the yolk just isn't the same, and dropping a 63C egg in to simmering water long enough to firm up the white. I think the latter technique will work best but I'm still trying to figure out how long it takes to get the firm white I want without overcooking the yolk.
I was able to play around a bit on Labor day. Both the potato salad and asparagus were cooked sous vide at 85C for 45 minutes. In the past I've soaked asparagus at 90C for 10 minutes, I think the lower temperature and longer time gives a better texture to the finished product. For the potato salad I tossed the potatoes in a mixture of Dijon mustard, dill pickle juice, salt, pepper and some dried dill. This was sealed in a vacuum bag and cooked along with the asparagus. The next day the potatoes were mixed with some diced onion and bell pepper, sliced asparagus and Mexican sour gherkin cucumbers that we had. I added a little mayo to half of the potato salad and left the rest mayo free for those who didn't want the extra fat. Both were excellent, this really is the best way I've found to cook the potatoes so they are complete permeated with flavor.
We were having polish sausages as the main course, so I wanted to make one more thing... really good sausage rolls. I'm a fan of New England split top rolls, the kind that are used for lobster rolls on the east coast, but they're a little hard to find in Chicago. I've grown fond of a recipe in an old King Arthur Flour catalog to which I've made a few changes. I prefer my bread doughs to have a long, cold fermentation in the refrigerator instead of letting them ferment at room temperature, I find the long ferment allows better flavor development, improved texture and makes the dough easier to work with. To do this you just need to decrease the amount of yeast in the formula, I halved the yeast in the original recipe for these rolls. This technique is particularly good for pizza dough, it not only gives you a great yeasty flavor in your crust but the dough is also much easier to stretch out. But the main advantage to this technique, and the reason that most pizzerias use it, is that it significantly increases the window in which the dough is usable. My dough is ready to go after 24 hours, but it will keep in the fridge for up to 5 days and still give me a great crust. The one disadvantage is that you can't just use the dough right out of the fridge, it needs to warm up first before being shaped. In the past I've just left it sitting on the counter for a few hours but this time I still had the Nomiku set up on the water bath from the day before so I thought I try something new. The dough had been cold fermenting overnight in a large zip-lock freezer bag. I set the temperature of the water bath to 35C and forced as much gas out of the bag as possible, closed it and clipped it to the side of the bath. After 7 minutes the bag had started to float due to the gasses being produced by the yeast, I flipped the bag over and let it go for another 7 minutes. Using the Nomiku I was able to bring the dough up to temperature in around 15 minutes, something that usually takes well over an hour! This is going to open up a lot of possibilities for week-night baked goods!
Subscribe to:
Posts (Atom)